Mary Berry, one of the most beloved figures in British cooking, has gained a reputation for her classic, straightforward recipes that never fail to impress. Her meringue recipe, a simple yet elegant dessert, exemplifies her culinary ethos-combining ease of preparation with sophisticated results.
Meringues, in their purest form, are light, airy confections made primarily of egg whites, sugar, and sometimes a hint of vanilla or lemon zest for added flavor. They are baked slowly at a low temperature until they develop a crisp, delicate shell that shatters upon bite, revealing a soft, marshmallow-like interior.
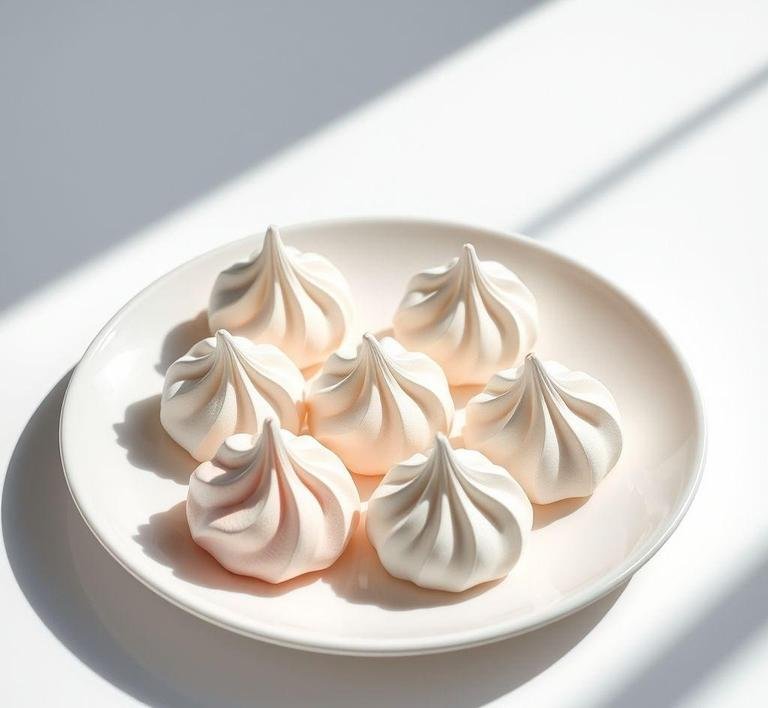
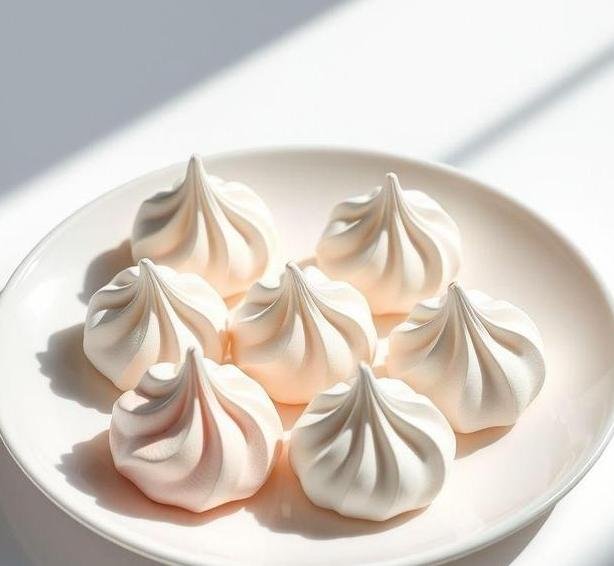
Mary Berry’s take on meringues is a nod to traditional techniques but with her signature twist to ensure consistency and perfect texture. Her recipe results in meringues that are crisp on the outside with just the right amount of chewiness inside-a texture that has made them a crowd favorite at tea parties, festive occasions, and as a delightful addition to any dessert table.
Mary Berry’s Meringues Recipe
Ingredients Needed
To achieve the ideal meringue, you don’t need a long list of ingredients, but precision is key. The ingredients in Mary Berry’s meringues are simple and accessible, yet when combined correctly, they create a dessert that feels like a true indulgence.
- Egg Whites (4 large): The backbone of any meringue, egg whites provide the airy texture that gives meringues their signature lightness. It’s important to use fresh egg whites at room temperature, as they whip up to their fullest volume when not chilled.
- Caster Sugar (225g): Caster sugar (superfine sugar) dissolves more easily than regular granulated sugar, which is crucial for achieving the smooth, glossy finish of the meringue. The sugar is added gradually to the beaten egg whites, ensuring the perfect balance of sweetness without graininess.
- Cornflour (1 tsp): Cornflour (cornstarch) is a key ingredient in Mary Berry’s recipe. It helps stabilize the meringue and gives it a slightly chewy center. This addition makes the meringue not only crispy on the outside but also with a satisfying softness inside.
- White Wine Vinegar (1 tsp): A touch of acid in the form of white wine vinegar is a traditional meringue ingredient that helps the egg whites maintain their structure while whipping, ensuring the meringue holds its shape during baking. It also helps prevent the meringue from cracking too easily.
- Vanilla Extract (1 tsp): Though optional, a teaspoon of vanilla extract adds a rich, aromatic depth to the meringue, enhancing the overall flavor.
Equipment Needed
While meringues are a relatively simple dessert to make, you’ll need a few key pieces of equipment to ensure success. Here’s what you’ll need:
- Electric Hand Whisk or Stand Mixer: Whipping egg whites to stiff peaks requires a lot of power, so an electric hand whisk or a stand mixer is crucial. A stand mixer, in particular, makes the process easier and more consistent, especially if you’re making a large batch.
- Mixing Bowls: Choose a large, clean mixing bowl made of glass or metal. Avoid plastic bowls, as they can hold onto traces of fat or grease, which will prevent the egg whites from reaching their full volume.
- Baking Tray: A flat, sturdy baking tray is essential to create an even surface for your meringues. Line it with baking parchment or a silicone baking mat to prevent sticking.
- Piping Bag (Optional): For uniform, elegant meringues, you can use a piping bag fitted with a plain nozzle. This allows you to pipe meringues into perfect rounds or swirls. If you don’t have a piping bag, you can spoon the mixture onto the tray, but piping will give you a more polished finish.
- Spatula: A rubber spatula is helpful for folding in the sugar and other ingredients, ensuring everything is fully incorporated without deflating the whipped egg whites.
Instructions To Make Mary Berry’s Meringues
Mary Berry’s meringue recipe is all about patience and attention to detail. Follow these steps, and you’ll have perfectly crisp, chewy meringues every time.
- Preheat the Oven: Start by preheating your oven to a very low temperature-around 120°C (250°F) for fan-assisted ovens. This slow baking process is key to creating meringues that are crisp and dry on the outside without over-browning.
- Prepare the Egg Whites: Separate the egg whites from the yolks, making sure no yolk contaminates the whites. This can be done using the eggshell halves or an egg separator. The egg whites must be absolutely free from any fat, so use a clean bowl to whisk them in.
- Whisk the Egg Whites: Using an electric whisk or stand mixer, begin to beat the egg whites on a medium speed until they become frothy and form soft peaks. This means that when you lift the whisk, the peaks of the egg whites should gently bend over.
- Add Sugar Gradually: Once you have soft peaks, begin adding the caster sugar one spoonful at a time, continuing to whisk on high speed. This slow addition allows the sugar to dissolve completely and helps the egg whites reach their glossy, stiff peak state. This process usually takes about 5-7 minutes.
- Add the Cornflour, Vinegar, and Vanilla: When the egg whites are glossy and stiff, gently fold in the cornflour, vinegar, and vanilla extract. This will stabilize the meringue and give it the characteristic texture.
- Shape the Meringues: If you’re using a piping bag, fill it with the meringue mixture and pipe it onto your prepared baking tray, forming rounds or nests. If you’re spooning the meringue, use two spoons to create rough dollops on the tray.
- Bake the Meringues: Place the tray in the oven and bake for about 1.5 hours. The meringues should be dry to the touch and easily lift off the parchment paper when done. If they’re browning too quickly, reduce the oven temperature slightly.
- Cool and Serve: Once baked, turn off the oven and let the meringues cool completely inside. This allows them to set and crispen up further. Serve them as is, or fill them with whipped cream and fresh fruit for a delightful pavlova-style treat.
Tips And Tricks
- Room Temperature Egg Whites: Make sure your egg whites are at room temperature before you start whipping them. Cold egg whites won’t reach their full volume.
- Avoid Grease: Any trace of grease or fat in your mixing bowl or whisk will prevent the egg whites from whipping properly. Ensure everything is impeccably clean.
- Be Patient with Sugar: When adding sugar, do so gradually. Rushing this step can result in a grainy texture instead of a smooth, glossy meringue.
- Oven Door: Resist the urge to open the oven door during the baking process. The fluctuating temperature can cause the meringues to crack.
- Make-Ahead: Meringues can be made ahead of time and stored in an airtight container for up to a week. This makes them an excellent option for parties or events where you need to prepare desserts in advance.
Mary Berry’s meringues are a quintessentially British treat, known for their delicate crunch and soft, marshmallow-like center. They may seem simple, but the attention to detail is what transforms them into something special. With just a few basic ingredients, a bit of patience, and a little technique, you can create a showstopping dessert that will wow your guests. Whether served on their own, paired with fresh berries, or layered into a decadent pavlova, these meringues are versatile and always delicious. So, next time you’re looking for a dessert that is both refined and simple to make, Mary Berry’s meringues are a perfect choice.
Easy Recipe Variations For Mary Berry’s Meringues
Mary Berry’s meringues are a true classic in the baking world, known for their crisp texture, delicate sweetness, and beautiful presentation. While her traditional recipe is already perfection, there are plenty of fun and creative variations you can try, allowing you to customize the flavor and appearance of these airy confections. Whether you’re looking to enhance the taste, add a burst of color, or give your meringues a twist, here are some easy variations to try:
1. Fruit-Flavored Meringues
To infuse your meringues with a natural fruit flavor, simply incorporate fruit powder or freeze-dried fruit into the meringue mix. Raspberry, strawberry, or lemon powder works wonders, adding a burst of flavor without affecting the texture. If you’re using freeze-dried fruits, pulse them into a fine powder in a food processor, and fold it into the meringue mixture before baking. The result? Beautifully flavored, pastel-colored meringues that are as pretty as they are delicious.
2. Chocolate Meringues
For those who crave a little extra indulgence, chocolate meringues are a must-try. To make chocolate meringues, simply sift in a few tablespoons of cocoa powder to the egg whites before beating them into stiff peaks. For an even richer chocolate flavor, you can fold in small chunks of dark chocolate at the end. These meringues will have a slightly darker color and a decadent chocolatey taste that pairs perfectly with whipped cream or fresh berries.
3. Coffee Meringues
Coffee-flavored meringues are a delightful option for any caffeine lover. Adding finely ground espresso powder to the egg whites as you beat them gives the meringues a subtle, yet distinctive coffee flavor. You can adjust the amount of espresso powder depending on how strong you want the coffee flavor to be. These meringues are perfect for pairing with a coffee-flavored mousse or a scoop of vanilla ice cream.
4. Lemon And Lavender Meringues
For a more sophisticated variation, try incorporating lemon zest and dried lavender into the meringue. The lemon zest brings a zesty, refreshing note, while the lavender adds a delicate, floral fragrance. This pairing works especially well for spring or summer events, where the light, fresh flavor will complement other seasonal desserts like fruit tarts or light sorbets.
5. Nutty Meringues
Add a crunch factor to your meringues by folding in finely chopped nuts like pistachios, almonds, or hazelnuts. The nutty flavors provide a pleasant contrast to the sweetness of the meringue. If you’re feeling adventurous, you can even sprinkle chopped nuts over the surface of the meringue before baking, giving them a decorative touch and an extra layer of texture. Pistachio meringues, in particular, offer a beautiful green hue and a savory-sweet flavor combination.
6. Colored Meringues
If you’re baking for a special occasion or just want to make your meringues a little more fun, you can add food coloring to the meringue mix. Simply divide the meringue into portions and add a few drops of gel food coloring to each portion. Use a skewer to swirl the colors together for a marbled effect. This is a great way to create a festive and eye-catching dessert, and the colors can be customized to match any theme or celebration.
Storing Leftovers
After indulging in Mary Berry’s meringues, there’s a good chance you might have some leftovers. The beauty of meringues is that they can be stored for a long time if kept properly. Here are a few essential tips for storing them to keep them fresh and crisp:
1. Air-Tight Container
The key to storing meringues is keeping them in an airtight container. Meringues are incredibly delicate and prone to absorbing moisture from the air, which can make them soft and chewy. To maintain their crisp texture, place the meringues in a well-sealed container that protects them from humidity. A tin or plastic container with a tight-fitting lid works well for this purpose.
2. Cool, Dry Place
Meringues are best stored in a cool, dry place away from sunlight and heat. The pantry or a kitchen cupboard is usually the ideal spot. Avoid storing them in the fridge, as the cold, moist air can affect their crispness. As long as they’re kept in a dry environment, meringues can last for up to a week without losing their texture or flavor.
3. Avoid Storing In The Freezer
Although some baked goods freeze well, meringues don’t fare well in the freezer. Freezing can cause them to lose their signature crunch and become unpleasantly chewy once thawed. For the best experience, it’s best to enjoy meringues within a few days of baking.
4. Reviving Soft Meringues
If, by chance, your meringues do soften after a few days, you can try reviving them. Preheat your oven to a low temperature (around 100°C or 210°F) and place the meringues on a baking sheet. Let them dry out in the oven for 10-15 minutes, keeping a close eye on them to avoid burning. This should help restore their crispiness and make them as good as new!
What To Eat With Mary Berry’s Meringues?
Mary Berry’s meringues are versatile and can be paired with a wide range of accompaniments to elevate their flavor and presentation. Here are some ideas for what to serve alongside or on top of your meringues:
1. Whipped Cream
Classic and simple, whipped cream is a natural partner for meringues. Whether you go for lightly sweetened whipped cream or add a hint of vanilla or lemon zest, its velvety texture complements the crispness of the meringue perfectly. You can also turn this into a more decadent treat by adding a drizzle of chocolate sauce or caramel.
2. Fresh Berries
Meringues and fresh fruit are a match made in heaven. Strawberries, raspberries, blueberries, or blackberries add a burst of freshness and color to the dessert. A generous serving of fresh berries can balance out the sweetness of the meringues and add a light, fruity element to each bite. You can also toss the berries with a little sugar or lemon juice to release their juices, making them even more flavorful.
3. Fruit Coulis Or Sauce
For a sophisticated touch, drizzle your meringues with a vibrant fruit coulis, like raspberry, passion fruit, or mango. The tangy, slightly tart sauce will provide a lovely contrast to the sweetness of the meringue, adding an extra layer of flavor and color. Alternatively, you can serve a drizzle of lemon curd, which adds a tangy and rich dimension.
4. Ice Cream
For an indulgent dessert, serve the meringues with a scoop of creamy ice cream. Vanilla, chocolate, or pistachio ice cream works well, but don’t hesitate to get creative with other flavors like honeycomb or coconut. You can break up the meringues and layer them into an ice cream sundae, or simply place them alongside the ice cream for a lighter, refreshing treat.
5. Mousse Or Creamy Fillings
If you want something richer, a smooth mousse-whether chocolate, raspberry, or lemon-can make an excellent filling for meringues. You can sandwich the meringues together with the mousse, or serve them topped with a dollop of it. The richness of the mousse paired with the crunch of the meringue creates a delightful contrast.
Conclusion
Mary Berry’s meringues are an iconic treat that has stood the test of time. Their light, airy texture, sweet flavor, and versatility make them a favorite for a wide variety of occasions. With the simple base recipe, you have endless opportunities to get creative and make them your own by incorporating different flavors, textures, and colors. Whether you stick with the classic version or experiment with variations like chocolate or fruit-infused meringues, you’ll be sure to impress your guests.
By following a few easy storage tips, you can keep leftovers fresh for up to a week, ensuring that you can enjoy these sweet treats long after they’ve been baked. Pairing Mary Berry’s meringues with whipped cream, fresh fruit, or rich mousse will elevate the dessert to new heights, making it a perfect addition to any gathering, from casual get-togethers to special celebrations. Whether you’re serving them as a standalone treat or incorporating them into a grander dessert spread, these meringues are sure to steal the show every time.
FAQs
What Is The Secret To Making Mary Berry’s Meringues Perfectly Crispy On The Outside And Soft On The Inside?
The key to Mary Berry’s perfect meringues lies in the technique of slowly baking them at a low temperature. This ensures they become crisp on the outside while staying soft and chewy on the inside. Another important step is to make sure the egg whites are whipped until stiff peaks form, and that the sugar is added gradually to avoid any graininess in the meringue mixture.
How Long Should I Bake Mary Berry’s Meringues For, And At What Temperature?
Mary Berry recommends baking meringues at a low temperature, usually around 110°C (230°F), for 1 to 1.5 hours. The meringues should then be left in the oven with the door slightly ajar to cool completely, allowing them to firm up and maintain their delicate texture.
Can I Make Mary Berry’s Meringues Ahead Of Time, And How Should I Store Them?
Yes, Mary Berry’s meringues can be made ahead of time and stored for up to a week. To store them, place the meringues in an airtight container at room temperature. Make sure they are kept in a dry place to prevent any moisture from softening their crisp texture.