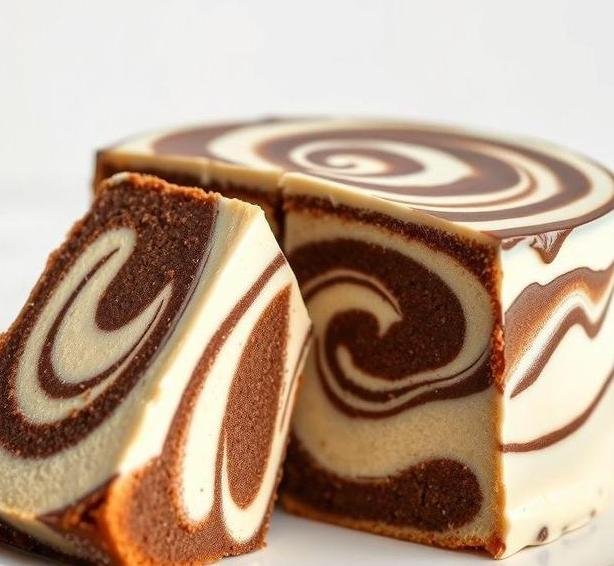
Mary Berry’s Marble Cake is a delightful blend of two cake flavors-vanilla and chocolate-that swirl together to create a beautiful marbled effect. This classic British recipe is often associated with the queen of baking herself, Mary Berry, whose baking expertise has become a household staple, particularly in the UK. The cake is known for its light, fluffy texture and its rich, flavorful combination of two batters, making it a visual and gastronomic delight. The technique of marbling not only gives the cake a stunning appearance, but it also offers a delightful contrast in flavor and texture, making it a favorite for both children and adults.
The cake is perfect for various occasions, from casual afternoon teas to festive family gatherings. What makes Mary Berry’s version so iconic is her ability to balance the simplicity of ingredients with the finesse of technique. Her marble cake is a moist, tender sponge with swirls of chocolate and vanilla that ensure every bite is an indulgence in both taste and presentation. It’s a cake that doesn’t just look impressive, but is also easy to make, making it ideal for both novice bakers and seasoned pros.
Mary Berry’s Marble Cake Recipe
Ingredients Needed

To make Mary Berry’s Marble Cake, you’ll need the following ingredients:
- Butter (unsalted) – 225g: This provides the cake with a rich, tender crumb.
- Caster Sugar – 225g: Caster sugar dissolves quickly and evenly into the batter, ensuring the cake has a fine, smooth texture.
- Eggs – 4 large: Eggs act as the binding agents, helping to give the cake structure while also contributing to its moisture and richness.
- Self-raising Flour – 225g: This flour contains a leavening agent, which helps the cake rise without the need for additional baking powder.
- Baking Powder – 1 tsp: An extra lift for the cake, helping it rise even more and keeping it light and fluffy.
- Vanilla Extract – 1 tsp: Adds a deep, sweet fragrance and flavor to the vanilla portion of the cake.
- Cocoa Powder (unsweetened) – 2 tbsp: For the chocolate layer, this gives the cake its rich, dark color and flavor.
- Milk – 2 tbsp: Helps to loosen the batter to the right consistency for easy mixing and pouring.
These ingredients combine in the perfect proportions to create a light, fluffy, and decadent marble cake that’s bursting with the flavors of both vanilla and chocolate.
Equipment Needed
To successfully bake Mary Berry’s Marble Cake, you will need the following equipment:
- Mixing Bowls – Two large bowls are essential: one for the vanilla batter and another for the chocolate batter.
- Electric Mixer or Hand Whisk – An electric mixer will make the job easier and faster, but a hand whisk will also work if you prefer a more hands-on approach.
- Spoon or Spatula – To gently fold in the ingredients, especially when dividing the batter between the vanilla and chocolate sections.
- Cake Tin (20cm or 8-inch round tin) – A round cake tin is perfect for achieving the traditional marble cake shape, giving it a soft, rounded top.
- Baking Paper or Non-stick Spray – To line the cake tin and ensure the cake comes out easily after baking.
- Sifter or Fine Mesh Strainer – For sifting the cocoa powder, which helps prevent any lumps from forming in the chocolate batter.
- Toothpick or Skewer – To swirl the batters together and test if the cake is fully baked.
These items make it easier to prepare the batter, bake the cake evenly, and achieve the beautiful marbled effect that makes this recipe so unique.
Instructions To Make Mary Berry’s Marble Cake
- Prepare the Cake Tin: Preheat your oven to 180°C (160°C for fan-assisted) or 350°F. Grease and line the cake tin with baking paper, ensuring it covers the base and sides.
- Cream the Butter and Sugar: In a large bowl, beat together the unsalted butter and caster sugar until pale and fluffy. This should take around 4-5 minutes using an electric mixer, or 7-8 minutes by hand.
- Add the Eggs: Beat in the eggs, one at a time, ensuring each one is fully incorporated before adding the next. If the mixture looks like it might curdle, add a little flour to bring it back together.
- Sift the Dry Ingredients: Sift the self-raising flour and baking powder together. Gradually fold the flour mixture into the butter-sugar-egg mixture, alternating with a tablespoon of milk. Continue until all the flour is combined, ensuring the batter is smooth and lump-free.
- Divide the Batter: Divide the batter into two bowls. In one bowl, stir in the vanilla extract. In the other, sift in the cocoa powder and mix it in thoroughly. If needed, add a splash of milk to both batters to achieve a soft, spoonable consistency.
- Create the Marble Effect: Spoon alternating dollops of the vanilla and chocolate batters into the prepared tin, creating a layered effect. Once the batter is in the tin, use a skewer or knife to gently swirl the batters together. Be careful not to over-mix – you want a marbled effect, not a fully blended one.
- Bake: Place the tin in the preheated oven and bake for 25-30 minutes, or until a skewer inserted into the center of the cake comes out clean. The cake should also spring back when lightly pressed.
- Cool: Once baked, remove the cake from the oven and allow it to cool in the tin for 10 minutes. Then, transfer it to a wire rack to cool completely before icing or serving.
Tips And Tricks
- Room Temperature Ingredients: Always use room temperature butter and eggs for a smoother batter. Cold ingredients can cause the batter to curdle, leading to a denser cake.
- Don’t Overmix: When combining the batters, resist the urge to overmix. The marbled effect relies on the contrast between the two batters, so gentle folding is key.
- Sift Your Cocoa Powder: Cocoa powder can sometimes form clumps. Sifting it before adding it to the batter ensures it mixes in smoothly and evenly, without any lumps.
- Test for Doneness: Because ovens can vary in temperature, it’s important to check the cake with a skewer before the end of the suggested baking time. Insert the skewer into the center of the cake, and if it comes out clean, it’s ready.
- Add a Glaze or Frosting: If you want to take the cake up a notch, drizzle a simple chocolate glaze or a dusting of powdered sugar over the top. Alternatively, you can frost the entire cake with a rich chocolate or vanilla buttercream for a more indulgent dessert.
- Flavor Variations: You can experiment with different flavorings or add-ins. A swirl of coffee or hazelnut extract in place of vanilla can create a whole new experience.
Mary Berry’s Marble Cake is a timeless dessert that perfectly balances simplicity with elegance. It’s a cake that’s ideal for all skill levels-whether you’re a beginner or an experienced baker. The light, fluffy texture, the contrast of vanilla and chocolate, and the stunning marbled effect make it a visual and flavorful treat. Plus, with just a handful of ingredients and a few simple techniques, this cake is incredibly easy to make. Whether you’re preparing it for a special occasion or just a cozy afternoon tea, Mary Berry’s Marble Cake is sure to impress everyone at the table. Its versatility also means that you can easily personalize it to suit your preferences or dietary needs. So, roll up your sleeves and start baking this showstopper-your taste buds will thank you!
Easy Recipe Variations For Mary Berry’s Marble Cake
Mary Berry’s Marble Cake is a timeless British classic, known for its soft, fluffy texture and the delightful swirl of vanilla and chocolate flavors. While the traditional version is delicious on its own, there are countless ways to tweak the recipe to suit your taste or to add a unique twist to the cake. Let’s explore some easy recipe variations that will elevate your marble cake to new heights!
-
Flavored Swirls
Instead of just chocolate and vanilla, you can experiment with different flavor combinations for your marbled cake. For instance, you could add a swirl of coffee for a sophisticated, slightly bitter note that contrasts beautifully with the sweetness of the cake. To do this, simply dissolve instant coffee or espresso powder in a small amount of hot water and fold it into the cake batter, just like you would with cocoa powder.
-
Citrus Marble Cake
Adding a zesty twist to your marble cake is a fun way to bring a fresh and fragrant flavor. You can infuse the batter with citrus zest-try orange or lemon. Mix the zest into the vanilla portion of the batter for a vibrant contrast with the chocolate. To enhance the citrus flavor further, you can drizzle a tangy citrus glaze over the finished cake.
-
Nutty Addition
For a bit of crunch, incorporate chopped nuts like almonds, hazelnuts, or walnuts into your marble cake. Sprinkle them into the chocolate portion of the batter to create a textural contrast that complements the smooth cake. You can also sprinkle them on top before baking to add an extra element of crunch and flavor.
-
Swapping Flour
To give the cake a different texture or make it suitable for dietary preferences, you could swap out the plain flour for alternatives such as almond flour or gluten-free flour blends. These flours will give your marble cake a slightly denser, richer texture but still keep that soft, moist crumb. Just ensure that you’re adjusting the ratios or adding extra binders, like xanthan gum, if you’re going gluten-free.
-
Adding Fruit
Another twist could be incorporating fresh or dried fruit into the batter, like raspberries, blackberries, or even dried apricots. The burst of tartness from the fruit can complement the sweetness of the cake, and it adds an exciting contrast to the vanilla and chocolate flavors. Be mindful of the moisture content of the fruit, as it might slightly affect the consistency of the batter.
-
Chocolate Variations
While Mary Berry’s original recipe calls for unsweetened cocoa powder, you can elevate the chocolate portion by swapping it out for dark chocolate, milk chocolate, or even white chocolate. You could melt the chocolate and swirl it into the cake batter, creating a rich, fudgy streak that blends seamlessly into the lighter vanilla sections.
Storing Leftovers
One of the best things about Mary Berry’s Marble Cake is how well it keeps. With the right storage, it can last for several days, remaining just as moist and flavorful as when it was first baked. Here’s how to properly store your leftovers and ensure that you can enjoy your cake for as long as possible:
-
Room Temperature Storage
If you plan to eat the cake within a few days, storing it at room temperature is the easiest option. Simply place the marble cake in an airtight container or cover it with plastic wrap or aluminum foil to prevent it from drying out. Ensure the cake is fully cooled before sealing it to avoid condensation, which could lead to sogginess.
-
Refrigerating
If you’re not going to finish the cake within a few days, or if the weather is particularly warm, storing it in the fridge can help it last longer. Wrap the cake tightly in plastic wrap, or place it in an airtight container to protect it from the dry air in the fridge. Refrigerated marble cake can last for up to a week, but you may find that it firms up a little, so be sure to allow it to come to room temperature before serving to bring back its soft texture.
-
Freezing
Freezing is a great option if you want to store the cake for even longer. Slice the marble cake into individual portions or freeze it whole. Wrap each slice (or the whole cake) tightly in plastic wrap and then in a layer of aluminum foil, or place the portions in freezer bags. This method will keep the cake fresh for up to three months. To thaw, simply leave the cake out on the counter for a few hours, or defrost it in the microwave for a quick snack. The cake might lose a little of its moisture when frozen, so it’s best enjoyed within a couple of months for the best flavor and texture.
What To Eat With Mary Berry’s Marble Cake?
Mary Berry’s Marble Cake is wonderfully versatile, making it the perfect companion for various beverages, spreads, and toppings. Whether you’re serving it as a treat for afternoon tea, a party dessert, or a snack, here are some ideas on what to pair with it:
-
Fresh Cream Or Whipped Cream
A dollop of whipped cream or fresh cream is a simple yet luxurious way to enjoy your marble cake. The creaminess complements the lightness of the cake and enhances the flavors of both the vanilla and chocolate portions. For an extra touch, you can add a dash of vanilla extract or a sprinkle of cocoa powder to the cream.
-
Ice Cream
Marble cake pairs beautifully with ice cream, especially creamy flavors like vanilla, chocolate, or hazelnut. For a truly indulgent dessert, serve a warm slice of the cake alongside a scoop of your favorite ice cream, letting it melt slightly into the cake. You can even drizzle a little chocolate or caramel sauce over the top for an extra decadent treat.
-
Fruit Compote Or Fresh Berries
Pairing your cake with fresh fruit can add a refreshing, slightly tart element that balances out the sweetness of the cake. Raspberries, blackberries, and strawberries are all great choices, or you could prepare a simple fruit compote with mixed berries, sugar, and a hint of lemon. This adds a burst of color and flavor, transforming the cake into a more complex dessert.
-
Tea Or Coffee
Mary Berry’s Marble Cake is the quintessential cake to serve at an afternoon tea. Its soft texture and comforting flavors make it the perfect accompaniment to a cup of English breakfast tea, Earl Grey, or a rich coffee. The slight bitterness of the tea or coffee balances the sweetness of the cake, creating the perfect pairing for a relaxing treat.
-
Nut Butters
For a slightly different twist, spread a layer of nut butter-like almond butter or hazelnut spread-on your slice of marble cake. The nutty flavor pairs wonderfully with both the vanilla and chocolate, offering a rich contrast that’s both satisfying and delicious.
Conclusion
Mary Berry’s Marble Cake is a beloved dessert that stands the test of time with its delicate combination of vanilla and chocolate flavors, its light, airy texture, and its versatility. Whether you choose to stick to the traditional recipe or experiment with flavor variations like citrus zest, coffee swirls, or nuts, there’s no shortage of ways to personalize this cake. Storing leftovers is a breeze, and with the right care, you can enjoy it for days to come. Whether served with cream, fruit, or your favorite hot beverage, Mary Berry’s Marble Cake will always make a delightful treat.
FAQs
What Are The Key Ingredients For Mary Berry’s Marble Cake?
Mary Berry’s marble cake requires basic cake ingredients such as butter, sugar, eggs, self-raising flour, and milk. To achieve the marbled effect, you will also need cocoa powder, which is mixed into a portion of the batter. The recipe often uses vanilla extract for flavor and a pinch of salt to balance the sweetness.
How Do You Achieve The Perfect Marble Effect In Mary Berry’s Marble Cake?
To create the signature marble effect, you need to divide the cake batter into two portions: one plain and one mixed with cocoa powder. After spooning alternating dollops of both batters into the cake tin, use a skewer or a knife to gently swirl the two mixtures together. Be careful not to over-mix, as this will blend the batters too much and lose the distinct marbled pattern.
Can I Make Mary Berry’s Marble Cake In Advance?
Yes, Mary Berry’s marble cake can be made in advance. In fact, it’s often better after a day or two, as the flavors have time to meld. Once baked and cooled, you can store it in an airtight container at room temperature for up to three days. If you want to store it for longer, consider freezing the cake in slices, wrapping it well in plastic wrap, and then in foil for up to three months.