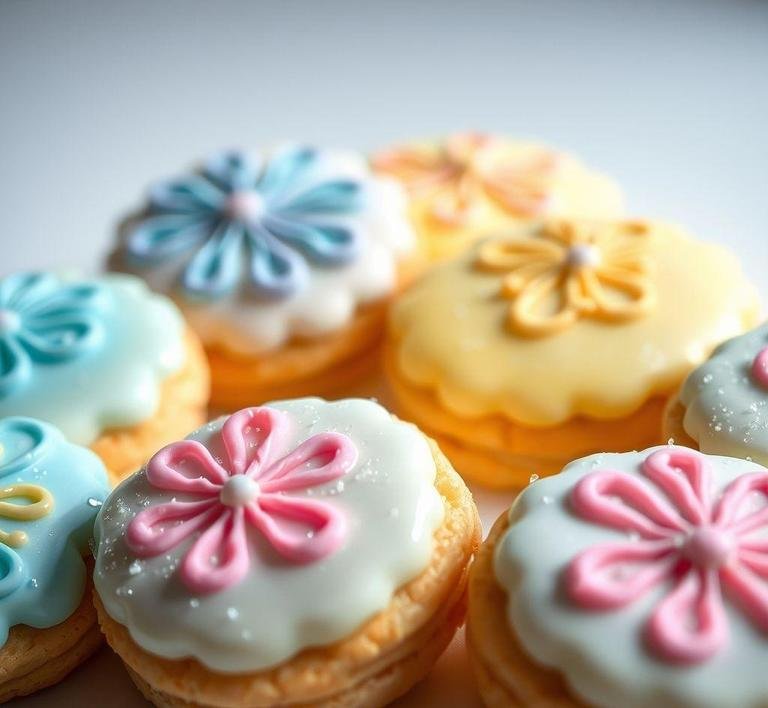
Mary Berry’s Iced Biscuits are a delightful treat that combine a perfectly crisp biscuit base with a sweet, glossy icing finish. They have become a staple in British baking, often associated with afternoon tea or as part of festive celebrations. Known for their simple yet elegant appearance, these biscuits are a perfect blend of buttery flavor and sweetness, making them a favorite among both beginners and experienced bakers.
What makes Mary Berry’s version stand out is the balance between the biscuit and icing. The biscuit itself is light and crumbly, with a slight richness from the butter, while the icing is smooth and sweet, often decorated with colorful sprinkles or patterns. These iced biscuits can be customized in various ways, from adding different colors of icing to shaping the biscuits into seasonal or themed designs. Whether you’re looking to create something special for a holiday, or simply want to bake a batch for a casual gathering, Mary Berry’s Iced Biscuits are versatile enough to suit any occasion.
The recipe is easy to follow and doesn’t require complex ingredients or equipment, which is another reason it’s beloved by bakers of all skill levels. The beauty of these iced biscuits is in their simplicity-just a few basic ingredients, a little bit of time, and a creative flair for decoration are all you need to make a batch that will impress.
Mary Berry’s Iced Biscuits Recipe
Ingredients Needed
To make Mary Berry’s Iced Biscuits, the ingredients list is straightforward and unpretentious, focusing on simple pantry staples. Here’s what you’ll need:
For The Biscuit Dough
- Butter (100g): Unsalted butter is the preferred choice. It provides richness and helps create that perfectly crumbly texture in the biscuit.
- Caster Sugar (50g): This fine sugar dissolves quickly and helps create a light, soft texture in the dough.
- Plain Flour (150g): This is the base of your dough, providing structure and allowing the biscuits to hold their shape during baking.
- Egg Yolk (1): The egg yolk contributes to the richness and also helps bind the dough together.
- Vanilla Extract (1 teaspoon): For a hint of aromatic sweetness that enhances the overall flavor of the biscuits.
- Pinch of Salt: To balance the sweetness and bring out the flavors in the dough.
For The Icing
- Icing Sugar (200g): This will give you the smooth, glossy finish on the biscuits. You can use more or less depending on how thick you want your icing.
- Water (a few tablespoons): To adjust the consistency of the icing. It should be thick but spreadable.
- Food Coloring (optional): If you want to add a splash of color to your icing, food coloring is a fun way to do so. You can also use different colors to create designs or patterns on the biscuits.
- Sprinkles or Edible Decorations (optional): These can add extra flair, especially if you’re making the biscuits for a celebration or festive occasion.
Equipment Needed
For this recipe, you don’t need anything too fancy. However, there are a few essential pieces of equipment that will make the process much smoother:
- Baking Tray: A large flat tray lined with parchment paper or a silicone mat for easy removal of the biscuits.
- Mixing Bowls: You’ll need a bowl to mix your dough and a separate one for preparing the icing.
- Rolling Pin: To roll out the dough to the desired thickness before cutting out your biscuit shapes.
- Biscuit Cutters: The beauty of these biscuits is in their shapes. You can use classic round cutters or get creative with themed cutters (hearts, stars, etc.).
- Wire Cooling Rack: To allow the biscuits to cool completely before icing, preventing any melt or smudge on your designs.
- Spoon or Palette Knife: To spread the icing onto the biscuits. A spoon works well for a more rustic look, while a palette knife gives you a smoother, professional finish.
- Piping Bags or Small Ziploc Bags (optional): If you want to get fancy with the decoration, using a piping bag allows you to create detailed designs. You can also use a Ziploc bag with the tip of the corner cut off for a makeshift piping bag.
Instructions To Make Mary Berry’s Iced Biscuits
-
Preheat The Oven And Prepare Your Tray
Start by preheating your oven to 180°C (160°C fan) or 350°F. Line a baking tray with parchment paper or a silicone baking mat to ensure your biscuits don’t stick during baking.
-
Make The Biscuit Dough
In a large mixing bowl, beat together the butter and caster sugar until pale and fluffy. You can do this using an electric mixer or by hand with a wooden spoon. Once combined, add the egg yolk and vanilla extract, mixing until smooth. Gradually add the flour and a pinch of salt, stirring until a dough forms. You may need to finish mixing by hand to bring the dough together fully.
-
Chill The Dough
Wrap the dough in cling film and place it in the fridge to chill for about 30 minutes. This helps to firm up the dough and makes it easier to roll out.
-
Roll Out The Dough
Once chilled, remove the dough from the fridge and roll it out on a lightly floured surface to about 0.5 cm thickness. Use your biscuit cutters to cut out your desired shapes. If you don’t have cutters, you can simply cut the dough into squares or rectangles.
-
Bake The Biscuits
Place the biscuit shapes on the prepared baking tray, leaving a little space between each one. Bake for 8-10 minutes, or until the edges are lightly golden. Keep an eye on them as they bake, as the cooking time can vary slightly depending on your oven.
-
Cool The Biscuits
Once baked, remove the biscuits from the oven and transfer them to a wire cooling rack to cool completely. It’s important to wait until the biscuits are fully cool before icing them, as warm biscuits can cause the icing to melt.
-
Prepare The Icing
While the biscuits cool, prepare your icing by sifting the icing sugar into a bowl. Add a few tablespoons of water, mixing until you achieve a thick but spreadable consistency. If you’d like to add food coloring, divide the icing into separate bowls and add the colors of your choice.
-
Ice The Biscuits
Once the biscuits are cool, use a spoon, palette knife, or piping bag to carefully spread the icing on top. You can make it as smooth or as textured as you like. If you’re feeling creative, you can pipe designs or patterns onto the icing, or sprinkle with edible decorations.
Tips And Tricks
- Chill the Dough Well: If your dough becomes too soft to work with, just pop it back into the fridge for a little while. Chilling ensures the dough doesn’t spread too much in the oven and keeps your shapes intact.
- Use Room Temperature Butter: If your butter is too cold, it will be harder to mix into the sugar. Room-temperature butter gives a smoother, creamier dough.
- Experiment with Icing Flavors: While the traditional icing is sweet and simple, you can mix things up by adding a few drops of flavoring to your icing, like almond extract or lemon zest. This gives a lovely twist to the traditional biscuit.
- Get Creative with Decorations: The beauty of iced biscuits is that they’re a blank canvas. Try adding sprinkles, edible glitter, or even tiny piped flowers for a personalized touch. If you’re making them for a holiday, you can use colored icing or themed shapes like hearts for Valentine’s Day or stars for Christmas.
- Don’t Over-Bake: Watch your biscuits carefully during the baking process. They should be just golden around the edges; overbaking can make them dry and crumbly.
Mary Berry’s Iced Biscuits are the epitome of simple, charming baking. With just a few pantry staples, you can create a batch of delicious biscuits that are both beautiful and fun to decorate. Whether you’re making them for a special occasion or just as a sweet treat, they’re sure to please everyone who gets a taste. Plus, the flexibility of the recipe allows you to experiment with different shapes, icing designs, and flavors. So grab your baking supplies, preheat that oven, and dive into the wonderful world of iced biscuits! You’ll be amazed at how such a simple recipe can bring so much joy to the table.
Easy Recipe Variations For Mary Berry’s Iced Biscuits

Mary Berry’s Iced Biscuits are a delightful treat that can easily be personalized with a variety of simple and creative variations. Her basic biscuit recipe, which serves as a perfect canvas, can be transformed with a few tweaks to suit different tastes or seasonal themes. Here are a few easy variations to elevate your iced biscuits:
-
Flavored Biscuits:
One of the simplest ways to add depth to the flavor of your iced biscuits is by infusing the dough itself with extra taste. For a citrus twist, try adding the zest of an orange or lemon to the dough. If you prefer something spicier, a pinch of ground cinnamon or ginger can provide a warm, comforting flavor. Alternatively, you could try a combination of vanilla and almond extract for a sweet, nutty profile.
-
Colorful Icing Variations:
The icing is where the fun begins with Mary Berry’s Iced Biscuits. Typically, she uses royal icing, but you can easily customize the colors and textures. For pastel hues, use a little food coloring to make soft pinks, blues, or yellows. If you’re feeling more festive, consider using vibrant colors like red, green, or purple. You could also add edible glitter or sprinkles for an extra pop of texture. For a more sophisticated look, try marbling the icing by swirling two or more colors together using a toothpick.
-
Decorative Themes:
The possibilities for decorating the biscuits are endless, depending on the season or occasion. For example:
- Christmas Biscuits: Shape your biscuits like stars, trees, or snowflakes. Then, decorate with white icing, and sprinkle with edible glitter or silver balls for a frosty effect.
- Easter Biscuits: Create flower or egg shapes, and decorate with pastel-colored icing and small sugar pearls or mini chocolate eggs.
- Birthday Biscuits: For birthdays, go all out with bright, bold icing colors, and use a piping bag to add intricate patterns like polka dots, stripes, or even a message or name.
-
Incorporating Different Fillings:
Another delightful way to give Mary Berry’s Iced Biscuits a twist is to sandwich them together with various fillings. A layer of strawberry jam, lemon curd, or chocolate ganache can elevate the flavor and provide a contrast to the crisp biscuit texture. When doing this, ensure the filling isn’t too thick, as it can cause the biscuits to lose their crispness.
-
Add Crunch with Nuts or Seeds:
If you’re looking for a little crunch alongside the soft biscuit base, consider adding chopped nuts (like pistachios, almonds, or hazelnuts) or seeds (such as sunflower or pumpkin seeds) to the dough. You can also sprinkle them on top of the icing for a delightful texture contrast.
-
Gluten-Free or Dairy-Free Options:
For those with dietary restrictions, Mary Berry’s recipe can be adapted to suit gluten-free or dairy-free needs. Substitute regular flour with a gluten-free flour blend and use dairy-free margarine instead of butter. The royal icing can easily be made dairy-free by opting for egg whites instead of traditional egg yolks.
These variations provide endless opportunities for creativity, making Mary Berry’s Iced Biscuits a versatile and fun recipe to adapt for any occasion or taste preference.
Storing Leftovers
Mary Berry’s Iced Biscuits are delightful when freshly baked, but they also have the potential to be enjoyed later, provided they are stored correctly. Proper storage ensures that the biscuits remain crisp, fresh, and flavorful for as long as possible. Here are some tips for storing your leftover iced biscuits:
-
Room Temperature Storage:
If you plan to enjoy the biscuits within a few days, you can store them at room temperature. Simply place the iced biscuits in an airtight container. Be sure to separate the biscuits with parchment paper or wax paper to prevent them from sticking together. Store the container in a cool, dry place away from direct sunlight and heat sources. The biscuits should stay fresh for about 4-5 days when stored this way.
-
Freezing Iced Biscuits:
For longer-term storage, freezing iced biscuits is an excellent option. Start by placing the biscuits in a single layer on a baking tray and freezing them for an hour or so. Once frozen, transfer the biscuits to an airtight freezer-safe container or a resealable freezer bag. Be sure to layer the biscuits with parchment paper to avoid them sticking together. These frozen iced biscuits will maintain their quality for up to 3 months.
When you’re ready to enjoy them, simply take the biscuits out of the freezer and let them thaw at room temperature for a couple of hours. However, avoid reheating them, as this can cause the icing to melt and lose its shape. Thawing is the best way to keep the biscuits’ texture intact.
-
Icing Considerations:
If you’ve used a lot of icing to decorate the biscuits, you may want to store them carefully to ensure the icing doesn’t get damaged. In this case, it’s important to let the icing harden completely before storing the biscuits. If the icing is soft or hasn’t fully set, it may smear and ruin the presentation. If you’re freezing the biscuits, ensure the icing is set before wrapping the biscuits individually.
-
Reviving Stale Biscuits:
Should your iced biscuits become a little stale after storage, there’s a simple trick to restore some of their crispness. Place the biscuits in a preheated oven at a low temperature (about 160°C or 320°F) for 5-10 minutes. This will help revive their crisp texture. However, be careful not to leave them in the oven too long, as this could cause the icing to melt.
By following these guidelines, your iced biscuits will remain just as delicious, whether enjoyed immediately or later.
What To Eat With Mary Berry’s Iced Biscuits?
Mary Berry’s Iced Biscuits are a delightful standalone treat, but if you’re looking to pair them with something to create a more substantial or varied snacking experience, there are plenty of delicious options to consider. Here are some ideas for what to eat with these lovely biscuits:
-
Tea or Coffee:
These biscuits are a classic pairing with a cup of tea or coffee. The sweetness of the icing and the crisp biscuit base complement the slightly bitter taste of the tea or coffee. For a more traditional British pairing, enjoy the biscuits with a warm cup of Earl Grey or English Breakfast tea. If you’re more of a coffee person, a cappuccino or latte would go beautifully with the rich sweetness of the biscuits.
-
Fruit Compote or Jam:
For a more indulgent snack, pair your iced biscuits with a spoonful of fruit compote, jam, or preserve. Strawberry, raspberry, or apricot preserves are particularly lovely with the buttery biscuits, as the slight tartness balances the sweetness of the icing. You could also go for a rich, homemade lemon curd for a zesty contrast.
-
Cheese:
If you’re in the mood for something savory to accompany your iced biscuits, a few slices of cheese can provide an interesting flavor contrast. Soft cheeses like cream cheese, mascarpone, or goat cheese work wonderfully, especially if you top them with a drizzle of honey or a few fresh herbs. Alternatively, a sharp cheddar or brie can add a savory note that complements the sweetness of the biscuits.
-
Ice Cream:
On a warmer day, why not treat yourself to a scoop of ice cream alongside your iced biscuits? Vanilla, chocolate, or even a fruit-based sorbet would pair wonderfully with the sweetness of the biscuits. A combination of the two textures-crunchy and creamy-will elevate your snacking experience.
-
Yogurt or Cream:
For a lighter, more refreshing option, try pairing the biscuits with a dollop of thick Greek yogurt or fresh whipped cream. The tanginess of the yogurt or cream contrasts nicely with the sweetness of the biscuit, creating a balanced and satisfying treat.
-
Fresh Fruit:
For a refreshing and lighter pairing, serve your iced biscuits with a side of fresh fruit. Berries, such as strawberries, raspberries, or blueberries, provide a fresh contrast to the sweetness of the icing. Alternatively, slices of citrus fruits like oranges or grapefruits can add a refreshing, tangy twist.
These pairings take the humble iced biscuit to a whole new level, whether you’re enjoying them with a hot drink or turning them into part of a decadent dessert spread.
Conclusion
Mary Berry’s Iced Biscuits are a versatile and beloved treat that can be enjoyed in countless ways. Whether you’re sticking to the classic recipe or experimenting with different flavors, colors, and decorations, the possibilities are endless. From simple flavor variations to creative decoration techniques, you can easily personalize these biscuits to suit your taste and the occasion.
Proper storage ensures that you can enjoy your iced biscuits long after they are made, with options for freezing or keeping them fresh at room temperature. And when it comes to enjoying these biscuits, there are so many delicious pairings-tea, jam, cheese, or ice cream-that can take your snack time or dessert to the next level.
In the end, Mary Berry’s Iced Biscuits remain a timeless favorite, whether enjoyed as a quick snack or as part of a more elaborate dessert spread. With their crisp texture, sweet icing, and endless customization options, they’ll continue to delight bakers and dessert lovers alike for years to come.
FAQs
What Ingredients Do I Need For Mary Berry’s Iced Biscuits Recipe?
For Mary Berry’s iced biscuits, you will need plain flour, butter, caster sugar, an egg, and a little vanilla extract for the dough. For the icing, you’ll need icing sugar, water, and food coloring (optional) to decorate the biscuits. The recipe also calls for baking paper to line your baking trays.
Can I Make Mary Berry’s Iced Biscuits In Advance?
Yes, you can make Mary Berry’s iced biscuits in advance! The biscuits themselves can be baked and stored in an airtight container for up to a week. The icing should be prepared on the day you plan to decorate, as it hardens over time. If you prefer, you can freeze the plain biscuits and ice them later, allowing them to thaw before decorating.
What Is The Best Way To Decorate Mary Berry’s Iced Biscuits?
To decorate Mary Berry’s iced biscuits, first, allow the baked biscuits to cool completely. For the icing, mix icing sugar with water to create a smooth, spreadable consistency. Divide the icing into separate bowls and add food coloring to each if you want multiple colors. Use a spoon or a piping bag to apply the icing to the biscuits. For extra flair, you can use sprinkles, edible glitter, or small decorations once the icing is set.