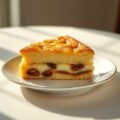
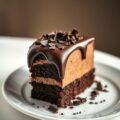
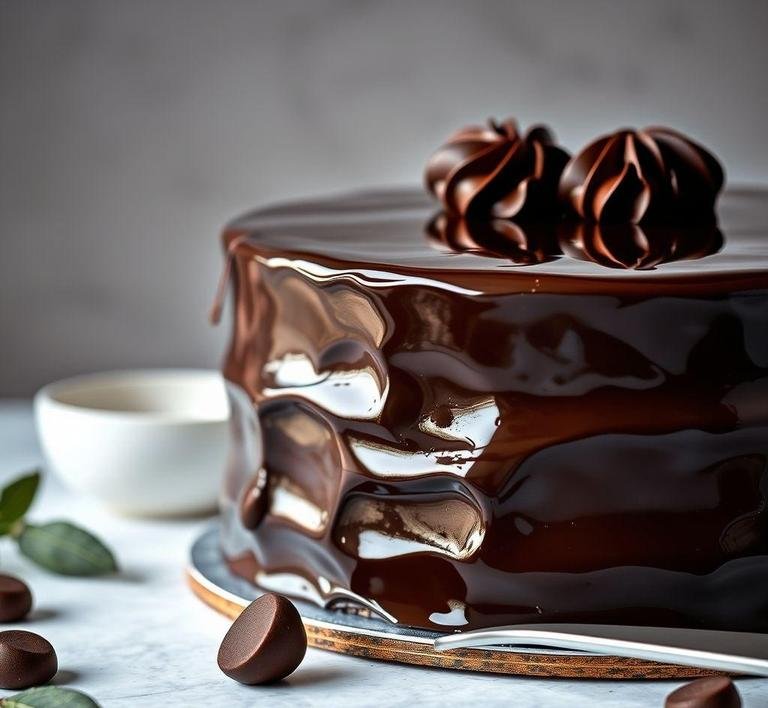
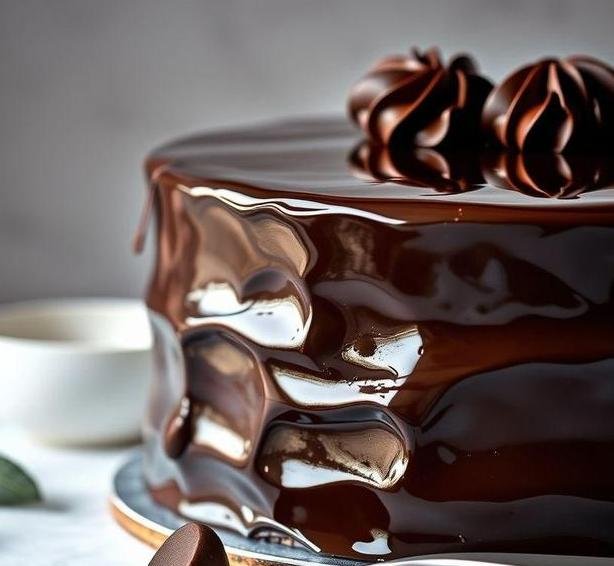
Mary Berry’s Chocolate Mirror Cake is a stunning showstopper dessert that marries rich chocolate flavors with an impeccable glossy finish. A beloved creation by the queen of British baking herself, this cake is an elegant combination of a light chocolate sponge, decadently smooth chocolate mousse filling, and a mesmerizing mirror glaze that reflects the cake’s beauty. Its lustrous appearance, which is as delicious as it is breathtaking, makes it a favorite for special occasions, particularly when you want to impress your guests.
What makes this cake stand out from other chocolate cakes is the mirror glaze. Unlike traditional icing, which can be thick and opaque, the mirror glaze provides a shiny, smooth surface that wraps around the cake like a glass-like coating. This glaze is often made with a combination of chocolate, sugar, and gelatin, creating that signature reflective sheen that catches the light and adds a touch of luxury.
Beyond its visual appeal, the flavors are equally delightful. The airy chocolate sponge provides a light, tender base while the mousse filling is rich and creamy, offering a contrast in texture. Altogether, the combination of these elements makes Mary Berry’s Chocolate Mirror Cake a sophisticated and decadent dessert that looks as if it was made in a professional bakery, yet is achievable for home bakers with the right techniques.
Mary Berry’s Chocolate Mirror Cake Recipe
Ingredients Needed
To create the magic that is Mary Berry’s Chocolate Mirror Cake, you’ll need the following ingredients:
For The Chocolate Sponge
- Butter – 175g, softened (for a rich and tender cake)
- Caster Sugar – 175g (provides sweetness and contributes to the cake’s lightness)
- Self-raising Flour – 175g (gives structure and helps the cake rise)
- Cocoa Powder – 25g (adds depth of flavor and a dark, rich color)
- Eggs – 3 large (binds the ingredients together and provides structure)
- Milk – 2 tbsp (moisture for the cake batter)
- Baking Powder – 1 tsp (to help the sponge rise)
- Vanilla Extract – 1 tsp (adds flavor depth)
For The Chocolate Mousse Filling
- Double Cream – 300ml (adds richness and creaminess to the mousse)
- Dark Chocolate – 200g (high-quality chocolate provides the base for the mousse flavor)
- Gelatin – 1½ tsp (helps the mousse set with a perfect texture)
- Icing Sugar – 2 tbsp (to sweeten the mousse slightly)
For The Mirror Glaze
- Water – 150ml (the base liquid for the glaze)
- Caster Sugar – 150g (provides sweetness and helps thicken the glaze)
- Condensed Milk – 100ml (adds a creamy texture to the glaze)
- Gelatin Sheets – 2 sheets (essential for achieving the perfect, smooth glaze)
- Dark Chocolate – 100g (gives the glaze its color and chocolate flavor)
- Cocoa Powder – 2 tbsp (to deepen the color and taste of the glaze)
Equipment Needed
When preparing Mary Berry’s Chocolate Mirror Cake, you’ll need some essential baking tools to help you through the process. Here’s a list of what you’ll need:
- 9-inch Round Cake Tin – For baking the chocolate sponge. You may also want to line it with baking parchment to ensure the cake doesn’t stick.
- Electric Mixer or Hand Whisk – To mix the batter for the sponge and the mousse, ensuring smooth and airy results.
- Mixing Bowls – For combining the various components of the cake.
- Heatproof Bowl – To melt the chocolate for both the mousse and the mirror glaze.
- Double Boiler or Microwave – To gently melt the chocolate.
- Sifter – For sifting dry ingredients like flour and cocoa powder to prevent clumps.
- Offset Spatula – To spread the mousse evenly inside the cake.
- Large Heatproof Jug – For preparing the mirror glaze.
- Thermometer – To monitor the temperature of the mirror glaze to ensure it’s the right consistency.
- Chilled Plate or Tray – For setting the mirror-glazed cake once it’s finished.
Instructions To Make Mary Berry’s Chocolate Mirror Cake
The process of creating Mary Berry’s Chocolate Mirror Cake involves several steps, from baking the sponge to preparing the mousse and the glaze. Let’s break it down:
Step 1: Preparing The Chocolate Sponge
- Preheat your oven to 180°C (160°C fan-assisted) or 350°F. Grease and line the base and sides of the cake tin with baking parchment.
- In a large mixing bowl, cream together the softened butter and caster sugar using an electric mixer until the mixture is light and fluffy.
- Add the eggs one at a time, beating well after each addition. If the mixture starts to curdle, add a little bit of the flour.
- Sift the self-raising flour and cocoa powder into the bowl and fold them into the mixture using a spatula. This will keep the batter light and airy.
- Add the baking powder and a couple of tablespoons of milk to loosen the batter, mixing until smooth.
- Pour the cake batter into the prepared tin and smooth the top with a spatula.
- Bake in the preheated oven for about 25-30 minutes or until a skewer inserted into the center comes out clean. Allow the cake to cool in the tin for 10 minutes before turning it out onto a wire rack to cool completely.
Step 2: Preparing The Chocolate Mousse Filling
- Melt the dark chocolate in a heatproof bowl over a double boiler or microwave, stirring occasionally until smooth.
- Bloom the gelatin by sprinkling it over a few tablespoons of cold water and letting it sit for a few minutes.
- Once the chocolate has melted, heat the double cream in a saucepan over medium heat until it begins to simmer. Remove from heat and add the gelatin to the cream, stirring until it dissolves completely.
- Pour the cream mixture into the melted chocolate and mix well.
- Allow the mousse mixture to cool to room temperature before transferring it to the fridge for about 30 minutes until it thickens.
- Once the mousse has thickened, spread it evenly between the two layers of the cooled sponge.
Step 3: Preparing The Mirror Glaze
- Soften the gelatin sheets in cold water.
- In a saucepan, combine the water, caster sugar, and condensed milk. Heat over medium heat, stirring until the sugar dissolves.
- Add the softened gelatin sheets to the saucepan, stirring until completely dissolved.
- Remove from heat and stir in the melted dark chocolate and sifted cocoa powder until smooth.
- Allow the glaze to cool to about 30°C (86°F) before carefully pouring it over the top of the cake. The glaze should cover the entire cake in a smooth, reflective layer.
Step 4: Assembling The Cake
- Once the mousse and sponge layers are set, place the assembled cake on a wire rack to catch any excess glaze.
- Pour the mirror glaze evenly over the top of the cake, ensuring the sides are fully covered. Allow the glaze to set for at least 30 minutes.
- Once set, carefully transfer the cake to a serving plate.
Tips And Tricks
- Chill the Cake Before Glazing: To ensure the mirror glaze sets correctly, make sure the cake is chilled before pouring the glaze. This helps the glaze adhere and creates that glossy finish.
- Temperature is Key: The temperature of the mirror glaze is essential for that perfect finish. Too hot and it will melt the mousse, too cold and it won’t flow smoothly over the cake.
- Use High-Quality Chocolate: The taste of your cake will rely heavily on the quality of the chocolate used, especially for the mousse and glaze. Opt for a good-quality dark chocolate with at least 70% cocoa solids for a rich, deep flavor.
- Practice Patience: Allow each layer to set properly before moving to the next step. Rushing the process can lead to messy results.
- Smooth the Glaze: When pouring the glaze over the cake, you can use an offset spatula to gently smooth the sides, ensuring an even coating all over.
Mary Berry’s Chocolate Mirror Cake is more than just a dessert; it’s a work of art that combines technique with flavor. The fluffy chocolate sponge, creamy mousse filling, and reflective mirror glaze come together in perfect harmony, offering both a feast for the eyes and the palate. While it may require several steps and a bit of patience, the end result is well worth the effort. Whether you’re preparing for a special occasion or simply want to treat yourself to something extraordinary, this cake is sure to be a showstopper. Don’t forget to share it with others-after all, such a masterpiece deserves to be enjoyed by everyone!
Easy Recipe Variations For Mary Berry’s Chocolate Mirror Cake
Mary Berry’s Chocolate Mirror Cake is a stunning dessert, famous for its glossy, reflective chocolate glaze that creates a show-stopping finish. It’s versatile, allowing bakers to experiment with different flavor profiles, textures, and even dietary requirements without compromising the integrity of the cake. Here are a few easy recipe variations that will help you personalize this already impressive dessert:
1. Add A Fruit Element
- Berries: Fresh raspberries, strawberries, or blackberries work wonderfully with the rich chocolate. A layer of berry compote or fresh berries placed between the layers of the cake provides a refreshing, tangy contrast to the sweet, velvety chocolate. You could even infuse the cake batter with a touch of raspberry or strawberry puree for an extra burst of fruity flavor.
- Citrus: Lemon or orange zest can be added to the batter or frosting for a citrusy note that brightens the flavor profile. A drizzle of orange or lemon syrup over the cake before glazing adds moisture and an aromatic depth.
2. Add A Nutty Twist
- Hazelnuts or Almonds: The creamy chocolate pairs beautifully with the richness of toasted hazelnuts or almonds. Chop the nuts roughly and scatter them over the mirror glaze once it has set, or stir them into the batter to create a crunchy texture. You could also add a layer of nut-based praline for an extra layer of sophistication.
- Peanut Butter: For a more indulgent flavor combination, incorporate peanut butter into the frosting or drizzle it over the top for a nutty, creamy contrast against the chocolate’s richness. A swirl of peanut butter in the mirror glaze can create a beautifully marbled effect.
3. Flavor Infusions In The Cake
- Coffee: Enhance the depth of the chocolate by adding a tablespoon of instant coffee or espresso powder to the batter. Coffee and chocolate are a classic pair, and the addition of coffee boosts the cake’s richness without overpowering the chocolate flavor.
- Spices: Spice up the flavor by incorporating a touch of cinnamon, cardamom, or chili powder into the batter. A pinch of cinnamon brings a warming, cozy note to the cake, while chili powder can give it a subtle kick that complements the chocolate’s sweetness in a surprising way.
4. Go Gluten-Free Or Dairy-Free
- Gluten-Free Option: Substitute the all-purpose flour with a gluten-free flour blend. For a richer texture, you could also use ground almonds or rice flour in place of wheat flour. Be sure to check the other ingredients to ensure they are gluten-free, particularly the mirror glaze, which may contain hidden gluten in some pre-made ingredients.
- Dairy-Free Option: Replace butter with dairy-free margarine or coconut oil, and opt for dairy-free chocolate. To replace cream in the glaze, use coconut cream or another plant-based cream substitute. Both adjustments make this cake suitable for vegan or lactose-intolerant diets.
5. Flavor Variations For The Mirror Glaze
The mirror glaze is what makes this cake so visually striking, and it’s a fantastic place to play with different flavors:
- Mint Chocolate Mirror Glaze: Add peppermint extract to the glaze for a refreshing mint-chocolate flavor combination. This is especially delightful around the holidays or for a mint-chocolate lover.
- Caramelized White Chocolate: For a sweeter, milder alternative to the classic dark chocolate mirror glaze, use caramelized white chocolate. This gives the cake a more golden tone and a rich, buttery flavor that contrasts wonderfully with the dark, rich cake.
6. Decorative Elements
For added creativity, use the mirror glaze as a base for further decoration. Use edible gold leaf, chocolate curls, or delicate sugar flowers to create a more elegant design. Crushed cookies, candied citrus slices, or even a sprinkling of edible glitter can make the cake sparkle and elevate it for special occasions like weddings or birthdays.
Storing Leftovers
When you’ve made a show-stopping Chocolate Mirror Cake, it’s important to know how to store any leftovers properly to keep them fresh and retain that glossy, beautiful finish. Here’s how:
Short-Term Storage (1-2 Days)
- Refrigeration: Because of the mirror glaze and its potential to melt at room temperature, it’s best to store any leftover cake in the fridge. Place the cake on a flat surface, ideally in an airtight container or under a dome, to prevent it from absorbing any other odors in the refrigerator. The cake should stay fresh for up to 2 days in the fridge.
- Storage Tip: If you are storing slices of the cake, use wax paper between layers to avoid sticking and to maintain the mirror glaze’s integrity.
Long-Term Storage (Up To 1 Week)
- Freezing: The cake can also be frozen if you want to extend its shelf life. Wrap individual slices in plastic wrap, followed by a layer of aluminum foil to prevent freezer burn. When you’re ready to enjoy the cake again, allow it to thaw in the refrigerator for a few hours. It may lose some of its mirror glaze’s glossy shine upon freezing, but it will still taste delicious.
- Storage Tip: If you freeze the entire cake, it’s best to freeze it before applying the mirror glaze. You can glaze it once it’s defrosted and ready to be served, which will help preserve the shiny finish.
How To Maintain The Mirror Glaze
- If you’ve already applied the glaze and it’s starting to lose its mirror-like quality in storage, a quick fix is to gently reheat the glaze (if you have any leftovers) and pour it over the cake again just before serving. The glaze will re-set as it cools, restoring its shine.
What To Eat With Mary Berry’s Chocolate Mirror Cake?
While this cake is decadent enough to stand on its own, pairing it with complementary foods and drinks can take the experience to the next level. Here are some suggestions:
1. Coffee Or Espresso
A strong coffee or espresso works wonders alongside the rich chocolate, helping to balance the sweetness and enhance the flavor profile of the cake. The bitterness of coffee highlights the richness of the chocolate and provides a beautiful contrast to the sweetness of the mirror glaze.
2. Berries Or Fruit Compote
A side of fresh fruit or fruit compote offers a bright and tart contrast to the deep chocolate flavor. Lightly sweetened raspberries, strawberries, or a citrusy orange compote can be a refreshing accompaniment, providing a balance to the cake’s richness.
3. Whipped Cream Or Ice Cream
For a truly indulgent dessert experience, serve the cake with a dollop of whipped cream or a scoop of vanilla or chocolate ice cream. The creamy textures contrast nicely with the dense, moist cake and the smooth mirror glaze, making each bite feel luxurious.
4. Nutty Snacks Or Candied Nuts
If you enjoy some texture, a handful of candied pecans, almonds, or hazelnuts on the side adds a delightful crunch and flavor pairing. The nutty sweetness can bring an additional layer of complexity to the dessert, complementing the chocolate without overpowering it.
5. Wine Or Dessert Cocktails
For an adult-friendly pairing, consider a glass of rich red wine such as a Merlot or a dark, fruity dessert wine like Port. For something more festive, a chocolate martini or a cocktail made with chocolate liqueur could be the perfect addition to a party or special celebration.
Conclusion
Mary Berry’s Chocolate Mirror Cake is a dessert that dazzles not only with its taste but also with its stunning visual appeal. Its versatility makes it a perfect choice for any occasion, whether you’re adding fruits, nuts, or trying out gluten-free and dairy-free versions. With a bit of creativity, you can easily personalize this cake to suit different tastes and dietary preferences, while the mirror glaze remains a spectacular, signature feature.
When it comes to leftovers, proper storage is key to keeping the cake fresh, allowing you to enjoy this delicious treat for days after baking. Whether paired with coffee, fresh berries, or a scoop of ice cream, this cake remains a favorite for any dessert lover. Perfect for celebrations or as a luxurious treat at any time of the year, Mary Berry’s Chocolate Mirror Cake is a timeless recipe that’s both indulgent and endlessly adaptable.
FAQs
What Makes Mary Berry’s Chocolate Mirror Cake Special?
Mary Berry’s chocolate mirror cake stands out due to its rich, glossy chocolate glaze and delicate layers of sponge cake. The chocolate mirror glaze gives it a luxurious finish, and the use of high-quality ingredients, like dark chocolate, ensures a deep, intense chocolate flavor. The combination of texture from the sponge and the smooth, shiny coating makes this cake a real showstopper.
Can I Substitute Ingredients In Mary Berry’s Chocolate Mirror Cake Recipe?
Yes, you can make a few substitutions depending on your dietary preferences or ingredient availability. For example, you can swap the whole milk for almond milk or another plant-based milk for a dairy-free version. If you’re not a fan of dark chocolate, you could use milk chocolate, though it will affect the overall taste and appearance of the mirror glaze. However, it’s important to keep the consistency of the sponge and glaze in mind when making substitutions.
How Can I Achieve A Perfect Mirror Glaze For Mary Berry’s Chocolate Cake?
To achieve a perfect mirror glaze, it’s essential to ensure the glaze is the right temperature and consistency before pouring it over the cake. The glaze should be smooth and slightly warm (around 30-35°C or 85-95°F). Make sure the cake is completely cooled and chilled before glazing to prevent the glaze from sliding off. Additionally, you can sieve the glaze before applying it to remove any lumps, ensuring a smooth, glossy finish.