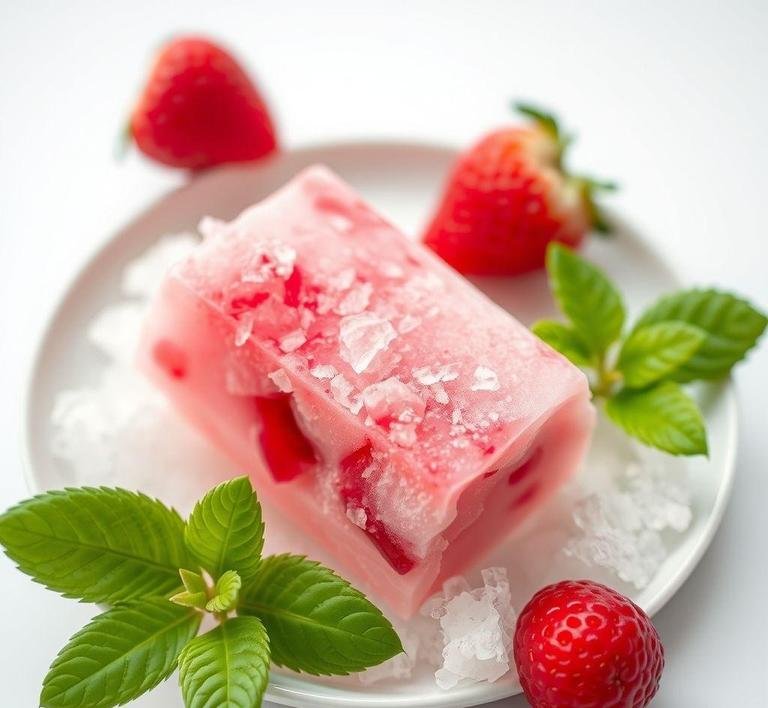
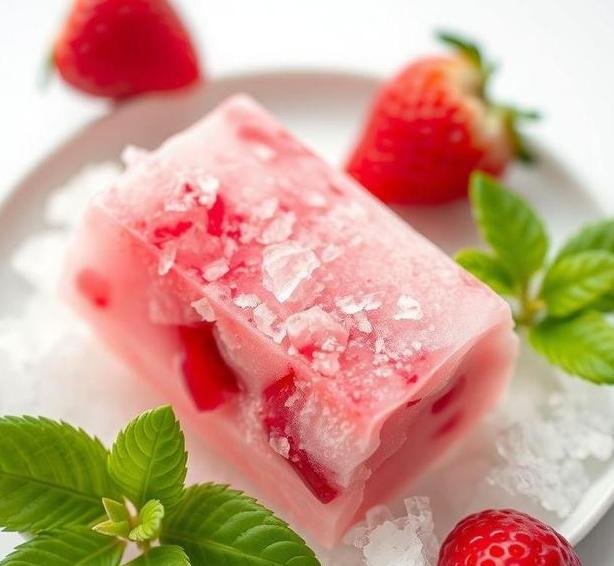
Mary Berry’s Coconut Ice is a timeless British confectionery treat that has graced teatime tables and festive gatherings for generations. This no-bake sweet is renowned for its vibrant, pastel pink and white layers that sandwich a chewy, melt-in-your-mouth coconut filling. Think of it as a beautifully simple bar of sweet, creamy coconut with a hint of vanilla and a slight chewiness that keeps you coming back for more.
What makes Mary Berry’s version stand out is her ability to blend the old-fashioned charm of homemade sweets with modern simplicity and precision. The recipe is straightforward enough for beginners but rich enough to satisfy seasoned bakers who crave that nostalgic, classic flavor. It’s the kind of treat that instantly evokes cozy memories-whether from childhood, holidays, or Sunday afternoons with a cuppa tea.
Coconut Ice’s appeal lies not just in its taste but in its striking, candy-striped appearance. The pink and white layers create a festive and eye-catching look, making it perfect for gift-giving or adding a splash of color to your dessert table. This treat is essentially a celebration of coconut’s tropical richness, balanced by just the right amount of sweetness.
Mary Berry’s Coconut Ice Recipe
Ingredients Needed
To create this delightful layered coconut treat, Mary Berry’s Coconut Ice recipe keeps things refreshingly simple, relying on pantry staples and a few specialized items:
- Icing sugar (powdered sugar): The foundation of sweetness, giving the coconut ice its melt-in-the-mouth texture.
- Desiccated coconut: Finely shredded, unsweetened coconut that adds texture and the unmistakable coconut flavor.
- Sweetened condensed milk: This is the secret ingredient that binds everything together while imparting a luscious creaminess and rich sweetness.
- Butter: Softened, to add smoothness and richness to the mixture.
- Vanilla extract: A splash for depth and to elevate the flavors beyond just sweet and coconutty.
- Pink food coloring: Traditionally, one layer of the coconut ice is tinted a pretty pastel pink, which makes the layers visually stunning and iconic.
Each of these ingredients plays a pivotal role-not just in flavor but in texture and appearance, creating that perfect balance of chewy, creamy, and sweet.
Equipment Needed
Mary Berry’s Coconut Ice recipe doesn’t call for fancy or complex tools. However, having the right equipment will make the process smoother and help you achieve that professional, polished finish:
- Mixing bowls: At least two, one for the white coconut layer and one for the pink.
- Wooden spoon or spatula: For combining the ingredients evenly without overworking the mixture.
- Loaf tin or square baking tin (about 8×8 inches or 20×20 cm): This is essential to shape the coconut ice into its classic rectangular form. Lining the tin with baking paper or greaseproof paper is highly recommended to allow easy removal.
- Measuring cups and spoons: Precision is key, especially with icing sugar and condensed milk.
- Knife: To slice the coconut ice neatly once set.
- Optional: Palette knife or bench scraper: For smoothing the layers before setting.
These simple tools ensure that you can create a neat, layered coconut ice that looks just as beautiful as it tastes.
Instructions To Make Mary Berry’s Coconut Ice
The beauty of Mary Berry’s Coconut Ice is in its straightforward process. It’s more about technique and care than complex cooking:
- Prepare your tin: Line your loaf or square tin with baking paper, leaving a bit of overhang on the sides for easy removal later.
- Mix the coconut base: In a mixing bowl, combine the softened butter, sweetened condensed milk, vanilla extract, desiccated coconut, and icing sugar. Stir gently but thoroughly until the mixture comes together into a sticky, malleable dough.
- Divide the mixture: Split the coconut mixture evenly into two bowls.
- Color the pink layer: Add a few drops of pink food coloring to one half and fold it in carefully until you achieve a soft pastel pink. Be cautious not to overmix or use too much color-you want that delicate tint, not bright neon.
- Layer in the tin: Press the white coconut mixture firmly and evenly into the bottom of the prepared tin. Use a spatula or the back of a spoon to create an even layer.
- Add the pink layer: Carefully spread the pink mixture on top of the white layer, pressing down firmly but gently to avoid mixing the two layers.
- Chill and set: Refrigerate the tin for at least 2 hours, or until the coconut ice is firm and easy to slice.
- Slice and serve: Use the overhanging baking paper to lift the set coconut ice from the tin. With a sharp knife, cut into neat squares or rectangles, wiping the knife clean between cuts to maintain clean edges.
Voilà! You have classic Mary Berry’s Coconut Ice, ready to delight your taste buds and brighten your dessert table.
Tips And Tricks
- Use quality ingredients: The taste and texture depend heavily on the quality of your coconut and condensed milk. Fresh, finely shredded desiccated coconut and thick, creamy condensed milk will elevate the end result.
- Don’t skip lining the tin: This makes removal effortless and prevents breakage.
- Achieve smooth layers: Pressing each layer firmly and evenly into the tin ensures that the coconut ice holds together well and slices cleanly.
- Adjust sweetness: If you prefer a less sweet version, slightly reduce the icing sugar, but remember the condensed milk adds significant sweetness too.
- Flavor variations: For a fun twist, try adding a few drops of almond extract instead of vanilla or incorporate finely chopped nuts for a crunch.
- Store properly: Coconut Ice keeps best in an airtight container in the fridge and can last up to two weeks-though it rarely sticks around that long!
- Use gel food coloring: It offers a richer hue with less liquid, helping maintain the right consistency.
Mary Berry’s Coconut Ice is more than just a confection-it’s a piece of British culinary heritage wrapped in pink and white layers of pure coconut bliss. With its simple ingredients, easy preparation, and eye-catching presentation, it’s the perfect treat to bring a touch of vintage charm to any occasion. Whether you’re a seasoned baker or a kitchen novice, this recipe offers a satisfying project with delicious rewards.
The beauty lies in its balance of creamy sweetness, chewy texture, and vibrant appearance, making it ideal for sharing at afternoon teas, birthday parties, or just as a sweet pick-me-up. By following Mary Berry’s method and tips, you can recreate this nostalgic classic with confidence, impressing friends and family with a homemade delight that’s as charming as it is tasty.
So why not grab those ingredients, dust off your loaf tin, and start layering your own batch of Coconut Ice today? It’s a small, sweet step back in time that’s guaranteed to brighten any day.
Easy Recipe Variations For Mary Berry’s Coconut Ice
Mary Berry’s Coconut Ice is a timeless treat-simple, sweet, and utterly delicious. But what’s wonderful about this classic recipe is how versatile it can be. If you’re looking to add your own twist or cater to different tastes, there are plenty of easy variations that don’t stray far from the original magic but add delightful new layers.
1. Chocolate-Dipped Coconut Ice:
One of the simplest yet most indulgent twists is to dip the finished coconut ice bars into melted dark or milk chocolate. After the coconut layers have set, carefully coat each piece in a glossy chocolate shell. This adds a wonderful contrast between the chewy, coconutty center and the crisp snap of chocolate. You can even sprinkle a little sea salt or crushed nuts on top before the chocolate hardens for added texture.
2. Fruity Flavors:
In place of or alongside the traditional pink food coloring, try infusing natural fruit flavors. For instance, blend in a few tablespoons of raspberry or strawberry puree to the pink layer to give it a fresh, tangy bite. Alternatively, using a bit of lemon or lime zest mixed into the white layer can brighten up the flavor and add a citrusy zing that balances the sweetness beautifully.
3. Vegan Coconut Ice:
For those avoiding dairy, you can swap the condensed milk for a homemade or store-bought vegan condensed milk substitute (made from coconut milk or almond milk, for example). Use coconut oil instead of butter, and voilà-you have a vegan-friendly version that retains the creamy richness and texture.
4. Nutty Additions:
For a bit of crunch, try stirring finely chopped pistachios, almonds, or macadamia nuts into one or both layers. This adds not just texture but also an earthy, nutty aroma that complements the sweet coconut perfectly.
5. Spiced Coconut Ice:
A dash of warming spices such as cinnamon, cardamom, or even a hint of ginger can transform the flavor profile, making it more complex and aromatic-perfect for festive seasons or just to add a little cozy twist.
Each variation offers a subtle shift, allowing you to tailor the treat to your mood, the occasion, or what you have in your pantry. The beauty lies in how the foundational recipe remains intact, while you experiment with flavors and textures to create something uniquely yours.
Storing Leftovers
One of the best parts of Mary Berry’s Coconut Ice is how well it keeps-making it a perfect make-ahead treat or a sweet snack you can enjoy over several days. But to keep that delicate texture and vibrant flavor intact, proper storage is key.
Room Temperature Storage:
If you plan to eat the coconut ice within a day or two, it can be kept at room temperature in an airtight container. Place parchment paper between layers to prevent sticking, especially if the pieces are stacked. Keep the container in a cool, dry place away from direct sunlight or heat sources to avoid melting or softening.
Refrigeration:
For longer storage, coconut ice fares well in the fridge. Again, use an airtight container to prevent it from absorbing any unwanted odors from other foods. The fridge helps maintain the firm, chewy texture of the coconut and preserves the fresh flavor. However, if refrigerated for too long, it can become a bit hard, so it’s best to bring the pieces to room temperature for about 15 minutes before enjoying.
Freezing:
Coconut ice freezes beautifully, which makes it ideal if you want to make a large batch ahead of time. Wrap individual pieces tightly in plastic wrap or wax paper, then place them in a freezer-safe container or bag. When you’re ready to eat, thaw at room temperature-this usually takes about 30 minutes to an hour. The texture and taste remain surprisingly intact, making it a convenient option for gifting or seasonal celebrations.
What To Eat With Mary Berry’s Coconut Ice?
While Mary Berry’s Coconut Ice is delicious on its own, pairing it thoughtfully can elevate your entire snack or dessert experience. Since it’s rich, sweet, and coconut-forward, pairing it with complementary flavors or textures is a wonderful way to highlight its qualities.
Tea and Coffee:
The classic pairing is a warm cup of tea or coffee. A strong black tea like Earl Grey or Assam cuts through the sweetness, balancing each bite with its robust, slightly bitter notes. For coffee lovers, a smooth latte or cappuccino offers creamy undertones that echo the coconut’s richness, making every mouthful feel like a mini indulgence.
Fresh Fruit:
Serve coconut ice alongside fresh fruit for a refreshing contrast. Tropical fruits like mango, pineapple, or passion fruit work beautifully as they echo the island vibe of coconut. Alternatively, berries such as raspberries or strawberries provide a tart, juicy counterpoint that refreshes the palate.
Ice Cream or Sorbet:
For an indulgent dessert, pair coconut ice with a scoop of vanilla bean ice cream or a tangy lemon sorbet. The creaminess of ice cream harmonizes with the coconut’s texture, while sorbet adds a zesty brightness that cuts the sweetness and keeps things light.
Cheese and Charcuterie Boards:
For a creative twist, include coconut ice as a sweet element on a cheese board. It pairs surprisingly well with soft, creamy cheeses like brie or mascarpone, and offers a tropical contrast to the savory cured meats. The sweetness acts like a palate cleanser between bites of rich, salty flavors.
Conclusion
Mary Berry’s Coconut Ice is more than just a nostalgic confection; it’s a versatile, delightful treat that lends itself to endless customization and pairing possibilities. Whether you stick to the classic recipe or venture into variations with chocolate, fruit, nuts, or spices, the simple joy of coconut and sweetness remains the heart of the experience.
Storing leftovers is straightforward and forgiving, making it a fantastic make-ahead snack or gift option. And when it comes to serving, pairing coconut ice with tea, fresh fruit, or even as part of an inventive dessert or cheese board elevates this humble sweet to a special occasion treat.
At its core, Mary Berry’s Coconut Ice is a celebration of simple ingredients and timeless flavor, inviting you to savor every bite while exploring your own creative twists. So why not whip up a batch, try a fun variation, and share the coconut love with friends and family? It’s a recipe that invites joy and sharing-just like Mary Berry herself.
FAQs
What Ingredients Are Needed For Mary Berry’s Coconut Ice Recipe?
Mary Berry’s coconut ice recipe requires just a few simple ingredients: desiccated coconut, sweetened condensed milk, icing sugar, and a few drops of natural food coloring (typically pink). These ingredients combine to create a deliciously sweet and chewy treat.
How Long Does It Take To Make Mary Berry’s Coconut Ice?
Making Mary Berry’s coconut ice is quick and easy. The preparation time is about 10 minutes, and after mixing, the mixture needs to be chilled in the fridge for about 1 to 2 hours to firm up before cutting it into squares.
Can I Customize The Flavor Or Color Of Mary Berry’s Coconut Ice?
Yes, you can easily customize Mary Berry’s coconut ice. To change the flavor, you could add a drop of vanilla or almond extract to the mixture. For color, the addition of food coloring is a simple way to make the coconut ice more vibrant. You could even create a layered effect by coloring each layer differently.