Mary Berry’s Cheese Scones are a classic British treat, blending the light, fluffy texture of traditional scones with the savory richness of cheese. Known for her mastery in the kitchen, Mary Berry’s recipe elevates this beloved snack, making it a popular choice for tea time, picnics, or even as a delicious side to soups and stews. The combination of sharp, tangy cheese, butter, and a hint of mustard (if you wish to add a bit of extra flavor) creates a perfectly balanced scone that’s both comforting and satisfying.
What makes Mary Berry’s version so special is her careful attention to the method, ensuring that the scones are as light and airy as possible. With her recipe, you get a soft crumb with a golden crust, a perfect texture that almost melts in your mouth with each bite. These scones are versatile, too-they can be served warm straight from the oven or made ahead of time and stored for later enjoyment. Whether you’re an experienced baker or just starting out, Mary Berry’s Cheese Scones provide an accessible yet delicious option for anyone looking to master a quintessentially British baked good.
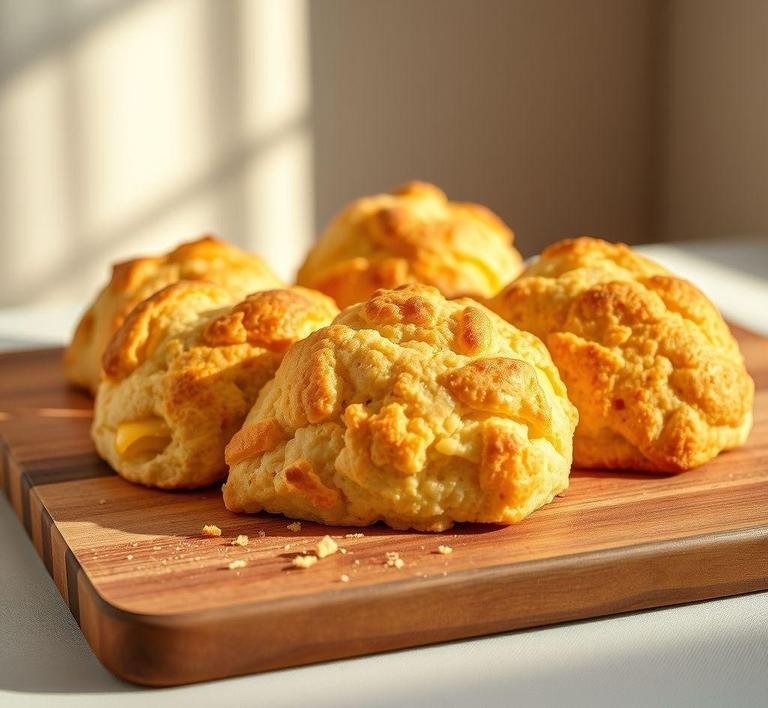
Mary Berry’s Cheese Scones Recipe
Ingredients Needed
To make Mary Berry’s Cheese Scones, you’ll need a simple set of ingredients that you likely already have in your pantry, with the star of the show being, of course, the cheese. Here’s what you’ll need:
- Self-Raising Flour (225g): This type of flour is key in creating the rise and fluffiness of the scones. If you don’t have self-raising flour, you can use plain flour and add a little baking powder.
- Butter (55g): Cold, cubed butter is essential for giving the scones their rich, flaky texture. The butter should be chilled and rubbed into the flour to create a breadcrumb-like texture.
- Cheddar Cheese (150g): A strong, mature cheddar works best as it gives the scones a bold, savory flavor. You can adjust the cheese quantity to your taste, but the sharper the cheese, the more flavor you’ll get.
- Milk (150ml): Milk adds moisture to the dough. You may also use buttermilk if you prefer a slightly tangier taste.
- Mustard Powder (optional, ½ tsp): Some recipes add mustard powder to complement the cheese and enhance the flavor. This step is optional but highly recommended for a savory kick.
- Salt (½ tsp): A pinch of salt balances the richness of the cheese and the butter.
- Egg (for egg wash, optional): An egg wash will give your scones a shiny, golden top once baked.
These basic ingredients, when mixed and baked properly, yield a batch of scones that are delightfully cheesy and irresistibly fragrant.
Equipment Needed
The equipment needed to make Mary Berry’s Cheese Scones is straightforward and won’t require any fancy gadgets. Here’s what you’ll need:
- Large Mixing Bowl: To combine all the dry ingredients like flour and salt and for rubbing in the butter.
- Grater: For grating the cheddar cheese-freshly grated cheese will melt into the dough better than pre-shredded cheese.
- Pastry Cutter or Your Hands: You’ll use this to rub the butter into the flour or you can use your fingers if you prefer. This process creates the crumbly texture that’s essential for a light scone.
- Rolling Pin: To roll out the dough. You’ll want to roll it out gently to about 2 cm thick for the scones to rise properly.
- Scone Cutter: A round cutter, usually around 5cm in diameter, is the best tool for cutting uniform scones. If you don’t have a scone cutter, you can use a regular glass or cup.
- Baking Tray: A sturdy baking tray to place your scones on while they bake.
- Pastry Brush: If you decide to use an egg wash, you’ll need a pastry brush to brush the top of the scones before baking.
- Oven: Your trusty oven is, of course, needed to bake the scones to perfection.
Having these pieces of equipment on hand will ensure that the process is smooth, and your scones will come out looking and tasting incredible.
Instructions To Make Mary Berry’s Cheese Scones
Making Mary Berry’s Cheese Scones is a straightforward process, but the key is in the technique. Here’s a step-by-step guide to making these light, cheesy delights:
- Preheat the Oven: Start by preheating your oven to 220°C (200°C for fan ovens), or 425°F. This high temperature helps the scones rise quickly and evenly, giving them that perfect golden crust.
- Prepare the Baking Tray: Line a baking tray with parchment paper or lightly grease it to prevent sticking.
- Mix Dry Ingredients: In a large mixing bowl, sift the self-raising flour and salt together. This helps aerate the flour and ensure an even distribution of the salt.
- Add the Butter: Cut the cold butter into small cubes and add them to the flour mixture. Use your fingertips or a pastry cutter to rub the butter into the flour until the mixture resembles breadcrumbs. The key here is to work quickly so that the butter remains cold, which helps create a flaky texture.
- Incorporate the Cheese: Grate the cheddar cheese and add it to the flour and butter mixture. Mix gently to combine. If you’re using mustard powder, you can add it here as well.
- Add the Milk: Pour in the milk gradually, stirring with a knife or your hands to bring the mixture together. The dough should be soft but not too sticky. If necessary, add a little more milk, but be careful not to make it too wet.
- Roll and Cut the Dough: Turn the dough out onto a lightly floured surface. Gently roll it out to about 2 cm thick. Using a round scone cutter, cut out scones from the dough. Don’t twist the cutter when you press down-this ensures the scones rise evenly.
- Prepare for Baking: Place the cut scones onto the prepared baking tray. If you’re using an egg wash, lightly brush the tops of the scones with a beaten egg to give them a golden finish.
- Bake: Bake the scones in the preheated oven for 12-15 minutes, or until they’re golden brown on top and have risen beautifully.
- Cool and Serve: Once baked, remove the scones from the oven and allow them to cool slightly. Serve them warm with butter, or enjoy them on their own. They’re perfect for pairing with a cup of tea!
Tips And Tricks
To ensure your Mary Berry’s Cheese Scones are perfect every time, here are some useful tips:
- Keep the Ingredients Cold: For light and fluffy scones, it’s important to keep your butter cold. If the butter melts too quickly, the scones won’t rise as much, and the texture will suffer.
- Don’t Overwork the Dough: When combining the ingredients, mix just enough to bring the dough together. Overworking the dough will result in dense scones.
- Use Fresh Cheese: Freshly grated cheddar will melt better and create a more even distribution of cheese throughout the scone. Pre-shredded cheese can be drier and won’t give the same effect.
- Use an Egg Wash: Brushing the scones with a beaten egg before baking will give them a lovely golden finish. You can also use milk or cream if you prefer a softer top.
- Baking Time and Temperature: If your scones are browning too quickly but aren’t done inside, reduce the oven temperature slightly and bake them a bit longer.
- Add Variations: Feel free to experiment by adding other ingredients, such as herbs like chives or thyme, or even a little bit of grated parmesan for a different flavor twist.
Mary Berry’s Cheese Scones are an absolute must-try for any fan of classic British baking. With their melt-in-your-mouth texture, sharp cheese flavor, and golden crust, these scones elevate any occasion. They’re easy to make, versatile, and an absolute crowd-pleaser. Whether served with a cup of tea, as part of a hearty breakfast, or paired with soup, these scones bring a comforting warmth to the table. With a few simple ingredients, the right technique, and a bit of patience, you’ll have a batch of scones that can rival those from any bakery. Happy baking!
Easy Recipe Variations For Mary Berry’s Cheese Scones

Mary Berry’s cheese scones are a quintessential British treat, loved for their rich, savory flavor and delicate, crumbly texture. However, while the original recipe is a tried-and-true classic, it’s always fun to put a little twist on a beloved dish. Here are some easy variations that you can try to bring a fresh touch to these scones while still maintaining their comforting essence.
-
Herb-Infused Cheese Scones
One simple variation is to add fresh or dried herbs to the dough. Thyme, rosemary, or chives are excellent choices that complement the sharpness of the cheese and add a fragrant, earthy note to the scones. Simply mix a tablespoon of finely chopped fresh herbs (or a teaspoon of dried) into the flour before you add the other ingredients. The herbs will infuse the scones with their flavor, turning each bite into a delightful herbaceous experience.
-
Cheese and Onion Scones
If you’re a fan of the classic cheese and onion combination, why not incorporate caramelized onions into your cheese scone mix? Lightly sauté a medium onion until golden and soft, then fold it into the dough along with your cheese. The sweet, savory flavor of the onions pairs perfectly with the sharpness of the cheese, creating a more robust scone. This variation is a great way to elevate the humble cheese scone into a more complex and flavorful version.
-
Cheese and Bacon Scones
Adding crispy bacon pieces to your cheese scones will bring a smoky, savory element that enhances the overall taste. Use about 4-5 slices of cooked, crumbled bacon and fold it gently into the dough. For an extra touch, sprinkle some grated cheese on top of the scones before baking to create a golden, crispy crust that adds texture and flavor. The combination of cheese and bacon is undeniably comforting and satisfying.
-
Cheese and Sun-Dried Tomato Scones
Sun-dried tomatoes bring a tangy, slightly sweet contrast to the richness of the cheese in your scones. Chop the sun-dried tomatoes finely, and incorporate them into the dough along with your choice of cheese. A hint of garlic powder or a sprinkle of basil can also complement the Mediterranean flavor of the tomatoes. These scones make for an ideal accompaniment to soups or salads, offering a more vibrant flavor profile.
-
Blue Cheese and Walnut Scones
For a more sophisticated take on the traditional cheese scone, try using blue cheese and adding some chopped walnuts for crunch. The earthy, pungent flavor of the blue cheese contrasts wonderfully with the buttery richness of the scone, while the walnuts provide a pleasant texture. This variation is perfect for those who enjoy bold, distinctive flavors and is ideal for a light lunch or elegant tea.
-
Cheese and Chilli Scones
If you like a little heat, you can add finely chopped fresh chili or chili flakes to the dough to create a cheese scone with a spicy kick. A combination of cheese with a touch of chili gives the scone a lively, bold flavor. Be careful not to overdo the chili-just a small amount will add enough heat without overwhelming the savory cheese flavor.
-
Cheese and Mustard Scones
Incorporating a tablespoon of Dijon or whole grain mustard into your cheese scone batter will add a subtle, tangy kick. The mustard amplifies the flavor of the cheese without overpowering it, creating a delightful balance. If you enjoy a bit of bite in your scones, this variation is an excellent choice. You can also experiment with different mustards to change the flavor intensity.
Each of these variations offers a new way to enjoy Mary Berry’s cheese scones while keeping the essence of the original recipe intact. Feel free to mix and match ingredients depending on your taste preferences, and don’t be afraid to experiment with different cheeses and add-ins.
Storing Leftovers
When it comes to storing leftovers, it’s important to keep Mary Berry’s cheese scones fresh for as long as possible so you can enjoy them at their best. Because these scones are typically best served fresh, they can lose some of their texture and flavor if not stored properly. Here are a few tips to make sure your cheese scones stay delicious for as long as possible:
-
Room Temperature Storage (Short-Term)
If you plan to eat your scones within a day or two, you can store them at room temperature. Place them in an airtight container or wrap them in a clean tea towel, and keep them in a cool, dry place. This will help preserve their freshness, though they may lose a little of their crispness. To refresh the scones, pop them in a hot oven for about 5 minutes to bring back some of the original texture.
-
Refrigerating Scones (Longer-Term)
For longer storage, you can refrigerate your scones to keep them from going stale. Wrap them tightly in plastic wrap or foil, then place them in a resealable bag or airtight container. Stored this way, they should stay fresh for up to 3-4 days. When you’re ready to eat them, simply heat them in the oven for about 5-10 minutes at 180°C (350°F) to restore their fluffiness and warmth.
-
Freezing Scones (Long-Term)
If you want to make a batch of cheese scones in advance and enjoy them at a later time, freezing is your best option. Let the scones cool completely before wrapping them individually in plastic wrap or aluminum foil. Then, place them in a freezer-safe bag or container, and label them with the date. Frozen scones can last for up to 3 months. When you’re ready to enjoy them, you can either bake them straight from the freezer at a lower temperature (around 160°C / 320°F) or let them thaw at room temperature before reheating in the oven.
By following these storage tips, you can extend the life of your cheese scones and ensure that they taste almost as good as fresh-baked when you’re ready for your next indulgent bite.
What To Eat With Mary Berry’s Cheese Scones?
Mary Berry’s cheese scones are a versatile dish that can be served as part of a meal, a snack, or at afternoon tea. Here are some tasty suggestions for what to pair with these savory treats, ranging from light accompaniments to more substantial sides.
-
Soups and Stews
Cheese scones are a perfect accompaniment to soups and stews. Their light, buttery texture and mild flavor complement the richness of a hearty vegetable soup, a creamy potato leek soup, or a robust beef stew. The scones can be torn apart and used to soak up the broth, making for a comforting and satisfying meal.
-
Salads
A simple green salad with mixed greens, cherry tomatoes, and a tangy vinaigrette pairs wonderfully with cheese scones. You can add roasted vegetables or a bit of grilled chicken to the salad for extra substance. The scones add a nice balance to the freshness of the salad, making this a perfect light lunch option.
-
Egg Dishes
Cheese scones are a great side for egg-based dishes. Serve them alongside scrambled eggs, a poached egg, or an omelet for a well-rounded breakfast or brunch. The scones provide a bit of richness that complements the creamy texture of the eggs.
-
Charcuterie Platter
A cheese scone is a lovely addition to a charcuterie board. Pair it with a selection of cheeses, cured meats, and some tangy pickles or chutney. The slight crunch and cheesy flavor of the scones balance the saltiness of the meats, creating a delightful contrast.
-
Sandwich Fillings
Cheese scones can also serve as a base for a savory sandwich. Slice the scone in half and fill it with your favorite fillings. Popular options include ham and mustard, smoked salmon with cream cheese, or a slice of cheddar with tomato and lettuce. The crumbly, buttery texture of the scone makes for a delicious sandwich alternative.
-
Fruit and Jam
If you prefer something a little sweeter, pair your cheese scones with a dollop of fruit jam or fresh chutney. Apricot, strawberry, or tomato jam works particularly well. The sweetness of the fruit spreads contrasts nicely with the rich, savory flavor of the scones.
-
Tea
For a more traditional pairing, serve your cheese scones with a nice cup of tea. A rich English Breakfast or Earl Grey would pair well with the savory scone, adding to the classic afternoon tea experience. The warmth of the tea enhances the flavor of the cheese while providing a soothing balance to the scone’s richness.
Conclusion
Mary Berry’s cheese scones are a versatile, delicious, and easy-to-make treat that can be enjoyed in many different ways. With endless variations-from adding fresh herbs and caramelized onions to experimenting with bacon or sun-dried tomatoes-you can personalize this recipe to suit any occasion or taste preference. Whether you’re serving them with soups, salads, or a cozy cup of tea, cheese scones always hit the spot. By following proper storage techniques, you can also enjoy your scones over several days or even freeze them for later enjoyment. So, next time you’re looking for a simple yet indulgent snack or addition to your meal, look no further than Mary Berry’s irresistible cheese scones!
FAQs
What Ingredients Are Needed For Mary Berry’s Cheese Scones?
To make Mary Berry’s cheese scones, you will need the following ingredients: self-raising flour (225g), cold butter (50g), strong cheddar cheese (100g), milk (150ml), an egg (1), and a pinch of salt. These ingredients combine to create a rich, cheesy, and soft scone texture that’s perfect for afternoon tea.
How Do I Make Mary Berry’s Cheese Scones Light And Fluffy?
To ensure your Mary Berry cheese scones are light and fluffy, it’s important to handle the dough as little as possible. Mix the dry ingredients and cheese together, then quickly rub in the butter until the mixture resembles breadcrumbs. When adding the milk, do so gradually, stirring gently. Overworking the dough will result in dense scones. Also, be sure to use self-raising flour to help the scones rise.
Can I Freeze Mary Berry’s Cheese Scones For Later Use?
Yes, you can freeze Mary Berry’s cheese scones! To freeze them, bake the scones first, then allow them to cool completely. Once cooled, wrap them in cling film or place them in an airtight container and store in the freezer for up to 3 months. When you’re ready to eat, reheat the scones from frozen in a preheated oven at 180°C (350°F) for about 10-12 minutes or until heated through.