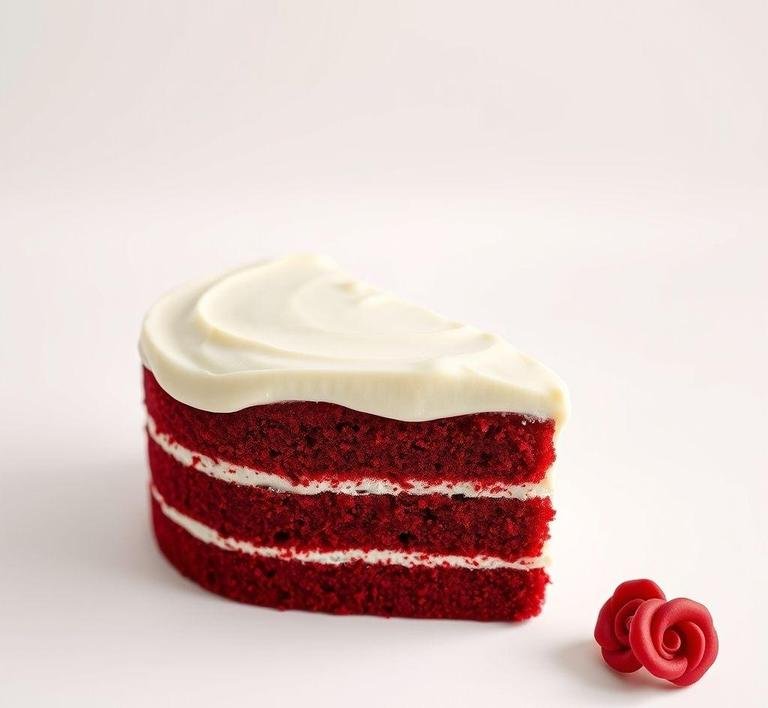
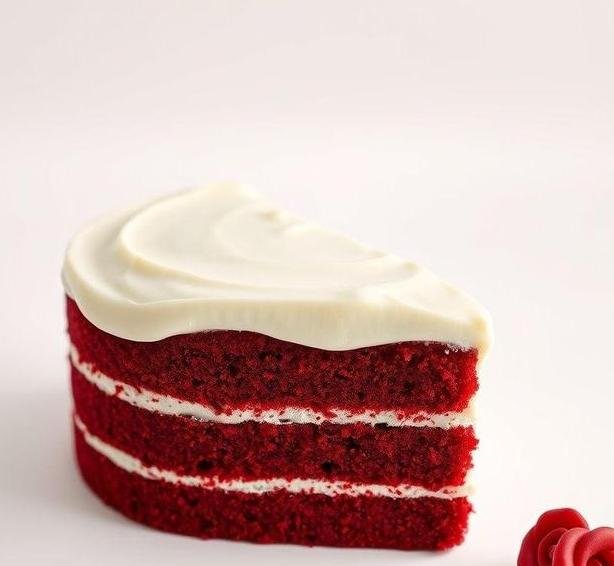
Mary Berry’s Red Velvet Cake is a showstopper in both appearance and flavor, elevating the classic American dessert to a refined British classic. Known for her gentle, easy-to-follow recipes, Mary Berry’s rendition of this iconic cake embraces the traditional allure of rich red layers, paired with the signature tangy cream cheese frosting. The striking crimson hue is not merely for visual appeal; it’s the result of a careful balance between cocoa powder and the acidic properties of buttermilk, which together create a tender and moist cake that is nothing short of divine. The cake is light but rich, and the frosting, smooth and slightly tangy, provides a perfect counterpoint to the sweetness of the cake itself.
Mary Berry’s version of Red Velvet Cake also tends to lean into practicality, offering a straightforward recipe that even novice bakers can master. The simplicity of her approach ensures that the cake’s dramatic flavor and visual impact remain accessible without compromising on taste. Whether you’re preparing it for a special occasion, a holiday gathering, or just because, Mary Berry’s Red Velvet Cake promises to impress with both its beauty and deliciousness.
Mary Berry’s Red Velvet Cake Recipe
Ingredients Needed
To create this delectable cake, you’ll need the following ingredients, which come together to form a vibrant, flavor-packed treat. Each element is important for achieving that perfect combination of fluffiness, tang, and sweetness.
-
For The Cake
- Plain flour – The foundation of the cake. Plain flour helps to maintain a light texture that is both soft and airy.
- Baking powder – This provides the necessary lift to give the cake its light, fluffy consistency.
- Cocoa powder – Red velvet cake traditionally uses a bit of cocoa to create a subtle chocolate flavor that balances the tangy frosting.
- Baking soda – Another leavening agent that helps the cake rise beautifully and adds to the soft crumb.
- Buttermilk – A key ingredient that contributes to the cake’s moist texture and enhances the flavor. The slight acidity of buttermilk also reacts with the baking soda, helping the cake rise.
- Vegetable oil – This ensures a moist and tender crumb, as oil adds moisture without making the cake dense or heavy.
- Caster sugar – Fine sugar dissolves quickly, creating a smooth, even batter for the cake.
- Large eggs – Eggs bind the ingredients together and provide structure to the cake, ensuring that it holds together beautifully when sliced.
- Red food coloring – The key ingredient for the iconic red hue that defines red velvet cake. While some prefer natural colorants, the traditional cake uses a liquid red dye to achieve that deep crimson tone.
- Vanilla extract – A touch of vanilla complements the rich cocoa flavor and adds depth to the overall flavor profile.
-
For The Cream Cheese Frosting
- Full-fat cream cheese – Rich and creamy, the cream cheese gives the frosting its smooth texture and slight tang, making it the perfect complement to the sweet cake.
- Unsalted butter – Butter provides richness and helps achieve a smooth, spreadable consistency for the frosting.
- Icing sugar – This sweetens the frosting and helps to thicken it to the perfect consistency.
- Vanilla extract – To enhance the flavor of the frosting and provide an extra layer of aromatic sweetness.
- A pinch of salt – Balances the sweetness and adds complexity to the cream cheese frosting.
Equipment Needed
For this recipe, you’ll need a few basic baking tools, most of which you likely already have in your kitchen. Here’s what you’ll need to gather:
- Two 20cm (8-inch) round cake pans – These pans are the ideal size for a classic layer cake. Mary Berry suggests using two round pans for a balanced layer of cake with plenty of space to rise.
- Mixing bowls – You’ll need separate bowls for the dry ingredients (flour, cocoa powder, baking powder, etc.) and the wet ingredients (eggs, buttermilk, oil).
- Electric hand mixer or stand mixer – While you can mix by hand, an electric mixer is a huge time-saver and helps you achieve a smoother batter and cream cheese frosting with less effort.
- Sifter or fine sieve – For sifting the dry ingredients (flour and cocoa powder) to ensure there are no lumps and that the ingredients are evenly distributed throughout the batter.
- Spatula or wooden spoon – These are useful for folding the ingredients together, especially when combining the wet and dry ingredients.
- Cooling rack – After baking, it’s essential to cool the cakes properly before frosting to avoid melting the cream cheese frosting.
- Offset spatula – If you have one, this is perfect for evenly spreading frosting on the cake layers and for creating smooth, even edges.
- Piping bag (optional) – For decorative touches or creating intricate designs with the cream cheese frosting, a piping bag can be helpful.
Instructions To Make Mary Berry’s Red Velvet Cake
Step 1: Prepare Your Pans
Preheat your oven to 170°C (fan 150°C) or 340°F. Grease and line two 20cm (8-inch) round cake pans with parchment paper. This ensures the cakes will come out of the pans without sticking and will have a smooth edge.
Step 2: Combine Dry Ingredients
Sift together the flour, cocoa powder, baking powder, and baking soda into a large bowl. This will help ensure your dry ingredients are well-mixed and free of lumps.
Step 3: Mix Wet Ingredients
In a separate bowl, whisk together the oil, eggs, caster sugar, vanilla extract, and buttermilk. The oil creates a smooth, moist batter, and the buttermilk reacts with the baking soda to help the cake rise. Add in the red food coloring and mix well until you achieve an even, deep red color.
Step 4: Incorporate Wet and Dry Ingredients
Gradually add the dry ingredients into the wet mixture, mixing gently with a spatula or an electric mixer on low speed. Be careful not to overmix, as this can lead to a dense cake. Stir until everything is just combined and the batter is smooth.
Step 5: Bake
Pour the batter evenly into the prepared pans and smooth the tops. Bake for about 25-30 minutes, or until a skewer inserted into the center of the cakes comes out clean. Allow the cakes to cool in the pans for 10 minutes before turning them out onto a cooling rack to cool completely.
Step 6: Make the Cream Cheese Frosting
While the cakes cool, prepare the frosting. Beat the softened cream cheese and butter together until smooth. Gradually add the icing sugar, a little at a time, until the frosting is thick and creamy. Stir in the vanilla extract and a pinch of salt for added flavor.
Step 7: Assemble the Cake
Once the cakes are completely cool, place one layer on a cake stand or serving platter. Spread a generous layer of cream cheese frosting on top, then place the second cake layer on top. Continue frosting the entire cake, smoothing the frosting on the sides and top. For a decorative touch, you can pipe swirls of frosting on top or around the edges.
Tips And Tricks
- Don’t skip the buttermilk – It’s essential for the texture of the cake. If you don’t have buttermilk, you can make a substitute by adding a tablespoon of lemon juice or vinegar to regular milk and letting it sit for 5 minutes.
- Use a good quality food coloring – To achieve the vibrant red hue, use a high-quality gel food coloring. Avoid liquid food colorings, which can alter the texture of the cake.
- Room temperature ingredients – Make sure your eggs, buttermilk, and butter are at room temperature before you begin. This helps the ingredients mix together more smoothly and prevents the batter from curdling.
- Don’t overbake – Overbaking can lead to a dry cake. Check the cakes early and remove them from the oven as soon as a skewer comes out clean.
- Chill the frosting – If the frosting seems too runny, chill it in the fridge for 20-30 minutes to firm it up before spreading.
Mary Berry’s Red Velvet Cake is a showstopping dessert that combines the richness of a chocolatey cake with the light, tangy sweetness of cream cheese frosting. The visual appeal of the deep red layers, paired with the creamy frosting, makes it an ideal treat for special occasions. With simple yet flavorful ingredients and easy-to-follow instructions, it’s a cake that both novice and experienced bakers can recreate with confidence. By following Mary Berry’s recipe and tips, you’ll create a cake that’s as delicious as it is beautiful, ensuring your next celebration is nothing short of spectacular.
Easy Recipe Variations For Mary Berry’s Red Velvet Cake
Mary Berry’s Red Velvet Cake is a timeless classic, adored for its moist, tender crumb, and that signature vibrant red hue. While the original recipe is a masterpiece in itself, sometimes a little twist can elevate it even further. Here are some easy and delightful variations to customize this cake to suit your taste or occasion:
-
Chocolate Red Velvet Cake
Traditional red velvet cake has a subtle cocoa flavor, but if you’re a true chocolate lover, why not amp up the chocolatey goodness? Add an extra tablespoon of cocoa powder to the batter. You could also mix in a bit of melted dark chocolate for richness. The deep cocoa flavor will beautifully complement the tangy cream cheese frosting.
-
Lemon Zest Red Velvet Cake
For a citrusy burst, consider adding lemon zest to the batter. The zesty, refreshing note works well with the rich cream cheese frosting, creating a harmonious balance of flavors. You could even drizzle a lemon glaze over the cake for added brightness.
-
Red Velvet Cupcakes
If you want to serve your cake in a more portable form, why not turn your red velvet cake into cupcakes? The preparation is just as simple. Portion the batter into cupcake liners and bake for around 18-20 minutes, checking for doneness with a toothpick. Once cooled, frost with the same luscious cream cheese frosting for a perfect individual treat.
-
Red Velvet with a Twist of Coconut
For a tropical flair, add shredded coconut to the batter or sprinkle it over the top of the frosting. The subtle coconut flavor pairs beautifully with the velvet smoothness of the cake, offering an exotic variation that still stays true to the cake’s original charm.
-
Red Velvet Cake with Raspberry Jam
A touch of raspberry jam can add a fruity contrast to the rich, buttery flavor of the cake. Simply spread a thin layer of jam between the cake layers before adding your cream cheese frosting. The tangy raspberries elevate the entire experience, offering both visual appeal and flavor depth.
-
Gluten-Free Red Velvet Cake
For those with dietary restrictions, making a gluten-free red velvet cake is simple. Substitute the regular flour with a high-quality gluten-free flour blend. Ensure that you also use gluten-free baking powder and check that your cocoa powder and other ingredients are certified gluten-free.
-
Red Velvet Cake with Nutty Crunch
If you’re craving a little texture contrast, adding chopped nuts such as walnuts or pecans into the batter can provide a satisfying crunch. Alternatively, you could sprinkle the chopped nuts on top of the frosting, allowing them to add both flavor and visual appeal.
Storing Leftovers
One of the best things about Mary Berry’s Red Velvet Cake is that it remains moist and flavorful even after a few days-making it the perfect cake to bake ahead of time. However, to ensure that your leftover cake stays as fresh as possible, there are a few essential storage tips to follow:
-
Room Temperature Storage (Short-Term)
If you plan to consume the leftover red velvet cake within a day or two, simply store it at room temperature. Place the cake on a cake stand or plate, cover it loosely with a cake dome or a large bowl, and leave it in a cool, dry place. Avoid wrapping it tightly, as this can make the cake soggy.
-
Refrigeration (Longer-Term Storage)
If you’ve made the cake ahead of time and need to store it for a longer period, refrigeration is the best option. Cream cheese frosting, in particular, requires refrigeration to maintain its freshness and safety. Place the cake in an airtight container or cover it tightly with plastic wrap. Refrigerating the cake will help preserve its texture, but make sure to let it come to room temperature for about 30 minutes before serving for optimal flavor and texture.
-
Freezing for Long-Term Storage
If you’ve made a large batch or want to save some for later, freezing Mary Berry’s Red Velvet Cake is a great option. First, make sure the cake is completely cooled. Slice it into individual portions or leave it as a whole. Wrap each slice or the whole cake tightly in plastic wrap and then in aluminum foil or place it in a freezer-safe container. The cake can last in the freezer for up to 3 months. To thaw, let the cake sit at room temperature for a few hours, or defrost it in the refrigerator overnight.
-
Frosting Storage
If you have leftover cream cheese frosting, it’s best to store it separately from the cake. Keep it in an airtight container in the refrigerator for up to 5 days. When you’re ready to serve, you can bring it back to room temperature and re-whip it to restore its smooth consistency.
What To Eat With Mary Berry’s Red Velvet Cake?
While Mary Berry’s Red Velvet Cake is delightful on its own, pairing it with complementary sides or drinks can elevate your dessert experience. Here are some ideas on what to eat with your cake to enhance its flavors:
-
Fresh Berries
A handful of fresh raspberries, strawberries, or blueberries can bring a tart contrast to the richness of the red velvet cake. The juiciness of the berries pairs wonderfully with the tangy cream cheese frosting, and the bright colors make the dish even more visually appealing.
-
Ice Cream
A scoop of vanilla ice cream or a flavor like cinnamon or caramel will make for an indulgent treat. The cold creaminess of the ice cream complements the softness of the cake, and the combination of textures makes each bite a rich experience. You could also serve with a drizzle of chocolate or caramel sauce for extra sweetness.
-
Whipped Cream
If you want something lighter to balance the richness of the cake, freshly whipped cream is an excellent choice. The light, airy texture of the cream pairs well with the dense, moist cake. A sprinkle of cocoa powder or cinnamon on top adds a nice touch of flavor and decoration.
-
Hot Beverages
For a cozy dessert pairing, consider serving your red velvet cake with a warm beverage. Coffee, cappuccino, or a rich hot chocolate would pair wonderfully with the cake’s tangy sweetness. Alternatively, a smooth cup of chai or a spiced tea can complement the subtle flavors of the cake while offering a comforting experience.
-
Cheese Plate
For a unique twist, serve your red velvet cake alongside a selection of cheeses. Soft cheeses like Brie or goat cheese, or a tangy blue cheese, can create a fun contrast with the sweet and tangy frosting. This unusual pairing is perfect for an afternoon tea or a special gathering.
Conclusion
Mary Berry’s Red Velvet Cake is more than just a visually stunning dessert; it’s a flavorful treat that strikes a perfect balance between richness and lightness, tanginess and sweetness. Whether you stick to the original recipe or opt for one of the easy variations mentioned above, this cake can be customized to suit any occasion. With a few simple changes, you can bring new life to this classic favorite, whether you’re making it for a party, a family gathering, or just for a little indulgence.
Once baked, be sure to store the cake properly, whether at room temperature, in the fridge, or even in the freezer, to keep it fresh for longer. And remember, Mary Berry’s Red Velvet Cake isn’t just something to eat on its own. Pair it with fresh fruit, whipped cream, or ice cream for an extra special treat that will impress all your guests.
FAQs
What Makes Mary Berry’s Red Velvet Cake Recipe Different From Other Versions?
Mary Berry’s red velvet cake recipe is known for its balance of flavor, moisture, and richness. Unlike some recipes that can be overly sweet or dense, Mary Berry uses buttermilk and vinegar, which gives the cake a light texture while maintaining a subtle tang. Her method of creaming the butter and sugar together until fluffy helps create an airy batter, ensuring a soft and tender crumb.
Can I Substitute The Buttermilk In Mary Berry’s Red Velvet Cake Recipe?
Yes, you can substitute buttermilk in Mary Berry’s red velvet cake recipe if you don’t have it on hand. To make a substitute, mix one cup of regular milk with one tablespoon of white vinegar or lemon juice. Let it sit for about 5 minutes before using it in the recipe. While this will replicate the tangy flavor of buttermilk, it may slightly affect the texture of the cake, but it will still yield a delicious result.
How Can I Ensure My Red Velvet Cake Doesn’t Turn Out Dry In Mary Berry’s Recipe?
To prevent your red velvet cake from turning out dry, it’s important to follow Mary Berry’s instructions carefully, especially when measuring your ingredients. Use room temperature ingredients, such as butter and eggs, for better incorporation into the batter. Be sure not to over-mix the batter, as this can lead to a denser texture. Additionally, check the cake’s doneness by inserting a toothpick in the center-it should come out with just a few moist crumbs, not completely clean. Overbaking is a common cause of dryness, so keep an eye on the cake during the final stages of baking.